Triggering integration actions
Table of contents
- Introduction
- Errors and error statuses
- Manual order actions
- Manual purchase order actions
- Trigger integration functions
Introduction
Ongoing WMS provides integrations to many systems. The integrations we have can be seen here. Most of the time, the integrations run automatically but in some cases it can be useful to manually trigger integrations. This is useful for example when:
- You need to re-fetch data after resolving an issue
- You want to ensure all changes since a certain date are captured
- You're testing the integration with historical data
Errors and error statuses
When the integration cannot report an order or purchase order back to the external system, it sets the order in an error status and writes the error message as a comment on the order. The integration then continues to run, so a single order in an error status does not stop the rest of the integration from working. You can read more about this in the guide about the integration flow and error handling.
The manual actions described on this page are used to resolve orders and purchase orders that have ended up in such an error status. When one of these actions resolves the error, Ongoing WMS will also try to reset the order to the status it had before the integration failed.
Manual order actions
For specific orders, you can perform manual actions when needed. Some common cases where this is useful:
- There are updates on the original order that have not been synced for some unknown reason
- The order in Ongoing WMS previously contained errors, blocking a previous update to be synced/reported
Note: The integration is only allowed to update order rows with no allocated goods or picked goods in Ongoing WMS.
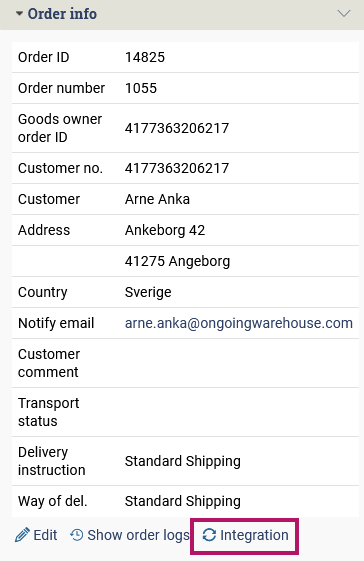
To reach the control with the actions you will need to expand an order and click on the Integration link:
This will open up a dialog with action buttons:
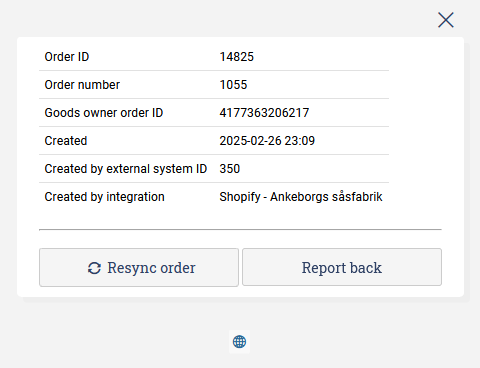
Resync the order
When resyncing an order it is only possible for the integration to update order rows with no allocated goods or picked goods in Ongoing WMS.
To resync the order, click the Resync order button.
Report the order
To report the order, click the Report back button.
Mark the order as reported
If an order cannot be reported correctly and you do not want the integration to keep attempting to report it, you can mark the order as reported in Ongoing WMS. This stops the integration from performing any more report attempts. The underlying issue then needs to be handled in the external system.
When you do this, Ongoing WMS will also try to reset the order to the status it had before the integration failed to report it.
To do this, click the Mark as reported button.
Mark returns as reported
The case described when reporting orders can happen for order returns as well.
If your order is stuck in such a loop for returns, and you know that the integration will never be able to report returns correctly, you can mark the order returns as reported in Ongoing WMS. This will stop the integration from performing any more return report attempts.
To do this, click the Mark return as reported button.
Manual purchase order actions
For specific purchase orders, you can perform manual actions when needed. The same scenarios that apply to orders also apply to purchase orders:
- There are updates on the original purchase order that have not been synced for some unknown reason
- The purchase order in Ongoing WMS previously contained errors, blocking a previous update to be synced/reported
Note: The integration is only allowed to update purchase order rows with no received goods in Ongoing WMS.
To reach the control with the actions you will need to expand a purchase order and click on the Integration link, similar to how it works for orders.
Resync the purchase order
When resyncing a purchase order it is only possible for the integration to update purchase order rows with no received goods in Ongoing WMS.
To resync the purchase order, click the Resync purchase order button.
Report the purchase order
To report the purchase order, click the Report back button.
Mark the purchase order as reported
If a purchase order cannot be reported correctly and you do not want the integration to keep attempting to report it, you can mark the purchase order as reported in Ongoing WMS. This stops the integration from performing any more report attempts. The underlying issue then needs to be handled in the external system.
When you do this, Ongoing WMS will also try to reset the purchase order to the status it had before the integration failed to report it.
To do this, click the Mark as reported button.
Trigger integration functions
Sometimes one might need to refetch data from a specific date and time or perform a stock sync outside of the normal schedule. This can be done from the integration settings page for each integration. To trigger integration functions, navigate to the integration settings for your specific integration and find the "Trigger integration" section.

Sync from specific date and time
To trigger integration actions from a specific date and time:
- Enter the date and time you want to sync from in the provided fields
- Click the appropriate sync button for the type of data you want to sync
The available sync options from a specific date and time include:
- Sync articles: Fetch product/article information for articles created or updated after the specified date
- Sync orders: Fetch orders that were created or updated after the specified date
- Sync purchase orders: Fetch purchase orders that were created or updated after the specified date
- Update stock: Push stock level updates from the specified date
- Sync return orders: Fetch return orders that were created or updated after the specified date
Note: The availability of these options depends on the specific integration. Some integrations may not support all types of data syncing.
Full sync actions
In addition to date-based syncing, you can also trigger synchronization of articles and stock levels without a date filter:
- Fetch all articles: Retrieve all articles/products from the external system
- Full stock sync: Push stock levels for all articles to the external system
Note: Use these functions with caution, as they may involve processing large amounts of data and could impact system performance. These actions are typically used during initial setup or when you need to ensure complete data consistency between systems.