Transporter assignment
Table of contents
- Introduction
- Maintaining the rules
- Examples
- Freight payer
- Video on how to set rules for automatically assigning transporters
Introduction
With transporter assignment, Ongoing WMS can automatically choose a suitable transporter for an order. The assignment is based on rules which are maintained by an administrator. For instance, you might want to make sure that all orders above a certain weight are shipped with a particular transporter.
Ongoing WMS can be set up so that the automatic transporter assignment is applied when orders are created, or when orders are closed. If you are interested in this feature, please discuss this with your contact person at Ongoing.
Outbound and return transporter
Each order may have both an ordinary, outbound transporter and a deviating return transporter. This can be used if you want to use a different transporter for the return label.
The system supports automatic transporter assignment for both the outbound transporter and the return transporter.
Maintaining the rules
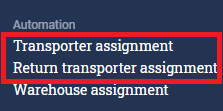
There are separate rule-sets for the outbound transporter and the return transporter. Go to Registers ⇒ Automation and select the rule-set which you want to edit:
The rest of this guide will be written for the outbound transporter, but the return transporter rules work exactly the same way.
Each rule is a row in a table. Each rule has a certain priority. When Ongoing WMS tries to figure out which transporter to use for a particular order, it performs the following procedure:
- It first finds all prioritization rows which match the given order.
- Then it selects the row with the lowest prioritization value.
You can use the following fields to set up the rules:
- Customer number
- Customer name
- Customer group
- Post code
- Country
- Number of order lines
- Ordered number of items
- Ordered weight
- Ordered volume
- Order comment
- Delivery country
- Order type
- Order classes
- Way of delivery
- Terms of delivery
- Market place
- Warehouse
- Order price
- Article group
- Article category
- Article classes
- Goods category
- Article dimensions
- Whether or not the order has a pickup-point specified
- Whether or not the order has a prepared shipment document specified
- Use large spans between each priority, e.g. create the first rule with priority 1000, and the second rule with priority 2000, and so on.
- Make the "most specific" rules have the lowest priority. E.g. if you want to have a special rule for a particular customer number, then that rule should appear early in the list.
- If you want to have different rules for different delivery countries, make sure that the countries are grouped together.
Rules based on article dimensions
It is possible to set up rules based on the article dimensions of the ordered articles. For instance, if you use a transporter which only accepts packages which are smaller than 1 meter in length, you can add a filter for "maximum article length on the order must be less than 1 meter" for that transporter's rule.
You can also use rules based on formulas which involve the article dimensions. For instance, you can have rule which is only applied if the "sum of height times ordered quantity" is less than a certain value.
The following article dimensions are available to use in transporter assignment:
- Max length
- Max width
- Max height
- Sum height*ordered quantity
- Max length + width + height
- Max length + max width + sum height*ordered quantuty
- Max 2*length + 2*width + length
- Max length + 2*width + 2*height
Examples
Below we provide some examples for how the rules can be set up. First, we describe in words what the rules mean, and then we show how it would be set up in the system.
Weight based
- Orders weighing at most 50 kg will use Transporter 1.
- Orders weighing between 50 kg and 200 kg will use Transporter 2.
- Orders weighing more than 200 kg will use Transporter 3.

Customer number based
- Orders for customer number CUS123 will use Transporter 1.
- All other orders will use Transporter 2.

Volume and country based
- All orders going to Denmark will use Transporter 1.
- All orders to Sweden and Norway with a volume of at most 1 cubic meter will use Transporter 2.
- All orders to Sweden and Norway with a volume of more than 1 cubic meter will use Transporter 3.
- Orders to any other country will not get any automatic transporter at all.

Freight payment
In Ongoing WMS it is possible to configure four different types of freight payers:
- Sender pay
- Receiver pay
- Third party pay
- None
When you edit an order, it is possible under Freight payment to select between sender pay, receiver pay, third party pay and None.
Sender pay means that the warehouse pays for the freight. This is the default setting for transporter assignment. To configure receiver pay or third party pay, you need to set this up since the transporter will usually need the customer number of the payer. This is done by first creating a freight agreement, which can be done through the interface when you edit an order. For receiver pay, it is also possible to add this transporter agreement to the customer.
To add the freight agreement to the customer, navigate to Order ⇒ Customer ⇒ Customer and then edit the desired customer. Here you can find a field called Transporter contract with a link: "+ Create new transport contract". In here you can set up the customer number for the desired service.
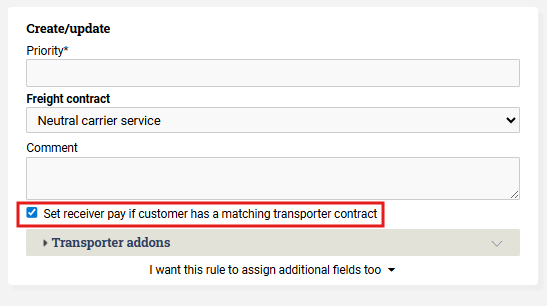
For receiver pay, it is possible to automate the assignment. In transporter assignment, turn the setting Set receiver pay if customer has a matching transporter contract to true. This will cause the transporter assignment to use receiver pay for all customers with a freight agreement set up.
Summarized:
- To set up sender pay, set up a freight agreement with your customer number for your TA-System. This is the default usage.
- To set up receiver pay, add a freight agreement on the desired customers and enable the setting in transporter assignment to automate the selection.
- To set up third party pay, create a freight contract with the third party's customer number. Otherwise, follow the same steps as sender pay.
Video on how to set rules for automatically assigning transporters