Aisles and locations
Table of contents
- Structure of the warehouse map
- Creating a new aisle
- Viewing the warehouse map
- Editing an aisle
- Configuring the locations
- Generating location labels
- Deleting warehouses, zones, and aisles
- Video on creating a warehouse, zones and aisles in Ongoing WMS
Structure of the warehouse map
To use Ongoing WMS, you need to first set up a model of your warehouse. This includes all the locations that you want to use. The warehouse map is organized in a hierarchical fashion. This means that you may group your warehouse locations on several different levels conceptually. The following levels are available:
| Name (English) | Name (Swedish) | Intended to represent |
|---|---|---|
| Warehouse | Lager | A physical warehouse building. |
| Zone | Zon | A subdivision of a warehouse building. For instance, a cold-storage facility may have one zone which is kept at below freezing and one zone which is kept at slightly above freezing. |
| Aisle | Gång | A contiguous group of locations. |
| Location | Lagerplats | A marked place where you can physically place goods. |
So, Warehouses contain Zones, and Zones contain Aisles, and Aisles contain Locations.
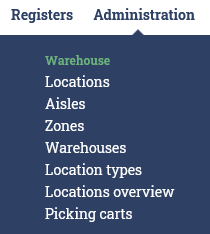
These objects can all be maintained in Administration ⇒ Warehouse:
After the warehouse map has been set up, it is possible to get a visual representation of it.
Creating a new aisle
To create a new aisle, do the following:
- Go to Administration ⇒ Warehouse ⇒ Aisles.
- Click Create new aisle
- Choose which zone it is in.
- Enter the name of the new aisle.
- Enter how long (X) and high (Y) the aisle is. That is, how many locations the aisle has on ground floor (X) and how many floors (Y) there are. The aisle will have X times Y locations.
- Enter the naming structure. This is a formula which determines how the locations in the aisle are named.
- Click Preview.
- If certain locations are not actually present (e.g. there may be physical beams in the warehouse which prevents there from being a location in that spot), delete those locations.
- When satisfied, click Create.
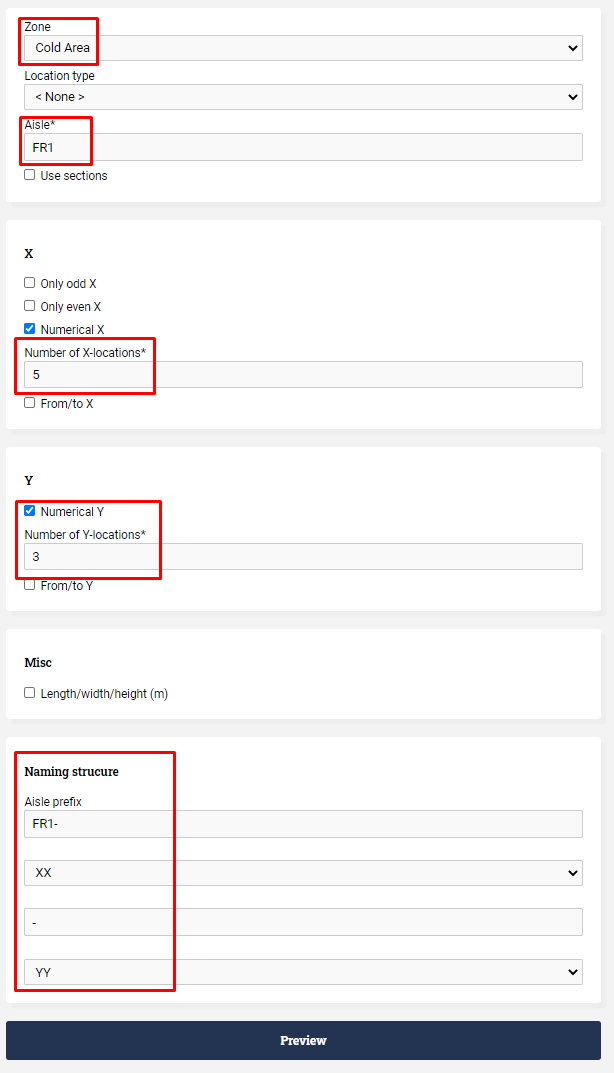
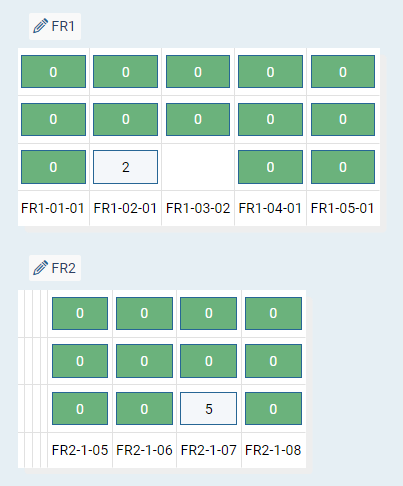
Example: numeric location names
We wish to create an aisle with the following specifications:
- It is 5 locations wide and 3 locations high.
- The locations in the bottom row should be called "FR1-01-01", "FR1-02-01", and so on.
- The locations in the top row should be called "FR1-01-03", "FR1-02-03", and so on.
- The location FR1-03-01 does not physically exist.
To do this, we fill out the form like so:
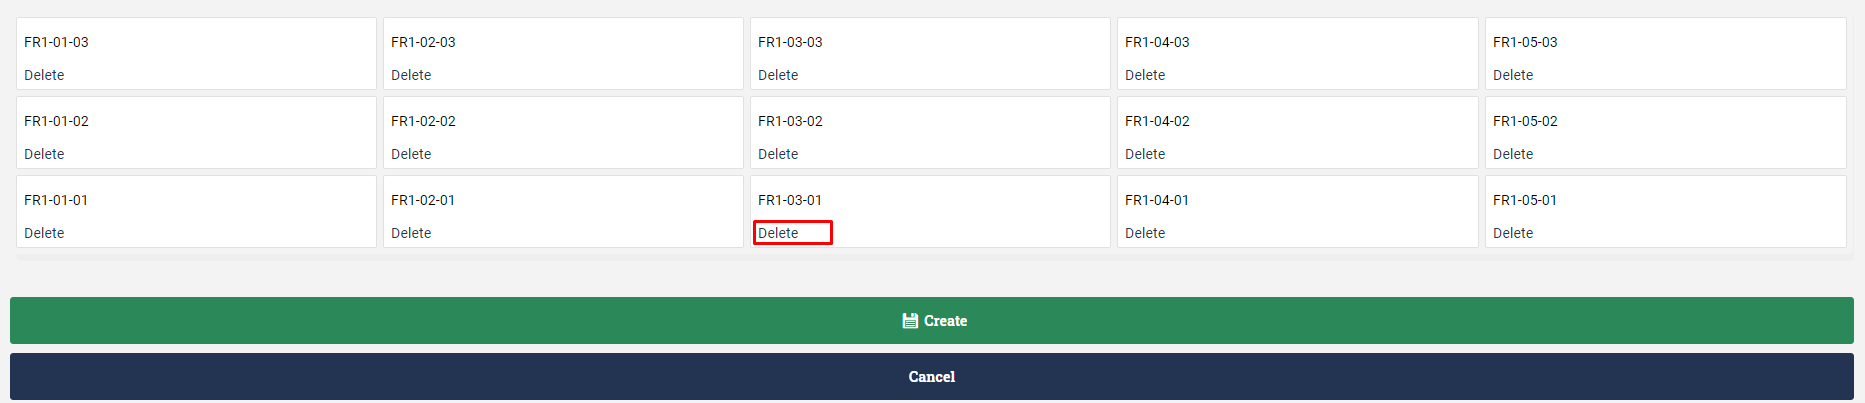
Then we click on Preview. At this point we can click on "Delete" on any location to remove it. After that, we click on Create.
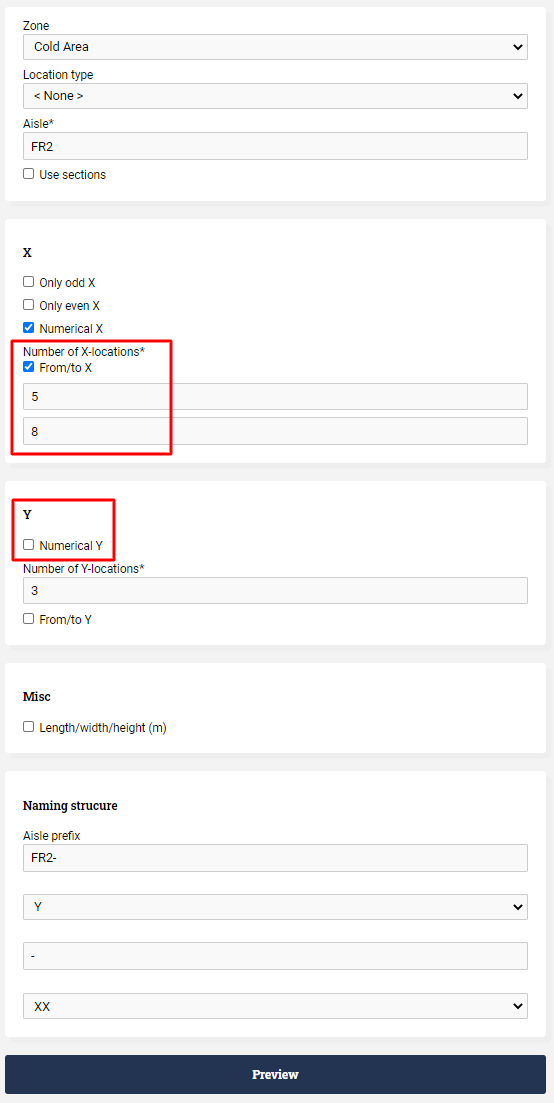
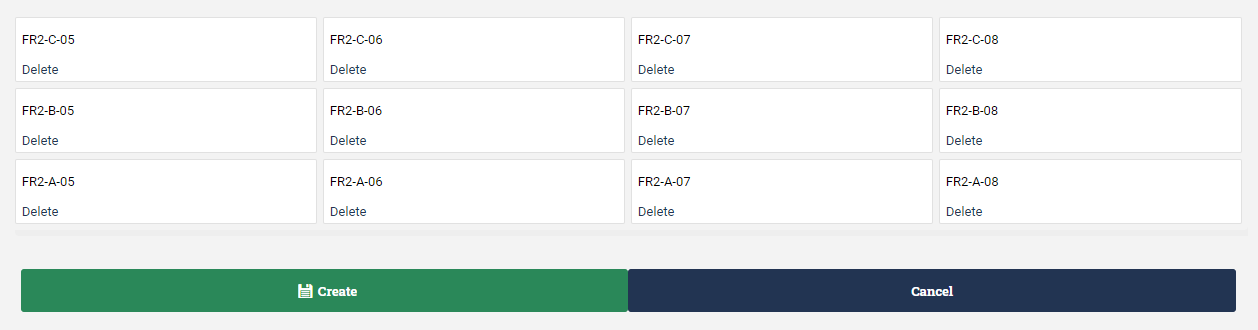
Example: location names with letters
We wish to create an aisle with the following specifications:
- It is 4 locations wide and 3 locations high.
- The locations in the bottom row should be called "FR2-A-05", "FR2-A-06", etc.
- The locations in the top row should be called "FR2-C-05", "FR2-C-06", etc.
This is like example 1, but not quite the same. There are the following differences:
- The names in the X direction don't start at 1 - they start at 5.
- The locations are named with the Y direction before the X direction.
- Instead of using digits for naming in the Y direction, we want letters (A, B, C) instead.
To accomplish this, we use the "From/To X" function to specify the starting and ending values for X. Then we uncheck "Numerical Y", which gives us letters for the Y direction instead of numbers:
After clicking Preview, we see the following:
Creating a new aisle using sections
Sometimes you want to create locations with multiple sections, e.g. a shelf spot contains two compartments where article items can be placed. In this case, you can create your aisle with the "Use sections" checkbox marked. This will make a new submenu appear with the label Z, see image. You can use this thrid dimension to specify the number of sections in a location. Note, each section will be treated as a location and is not a separately defined location type.
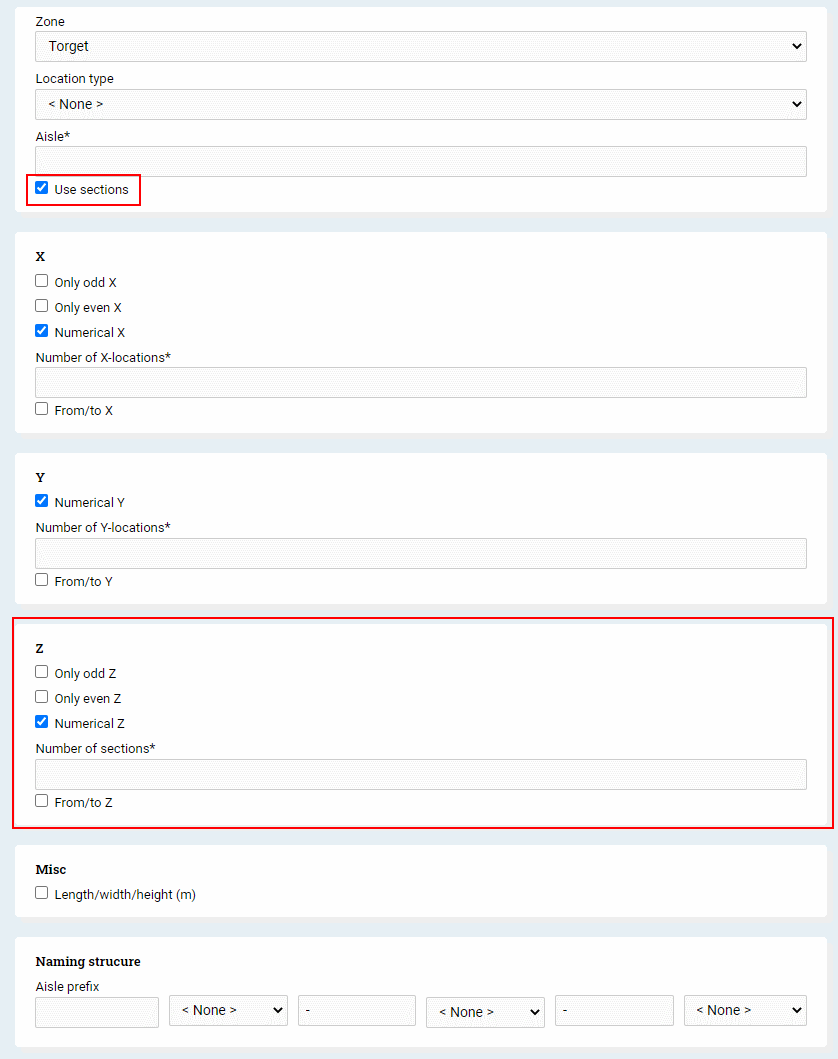
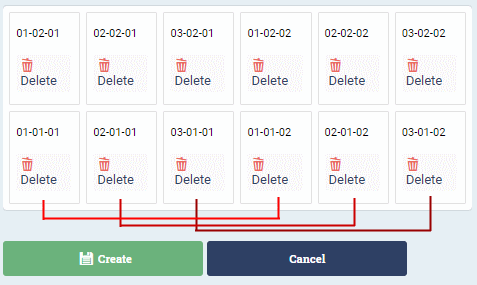
The most important thing to understand when using the Z dimension, is how to get the location labels correct. Lets say we want to represent an aisle with 2 floors, 3 shelf spots, and where each shelf spot contains 2 compartments. If we were to enter X = 3, Y = 2, Z = 2, and labeled in the format XX-YY-ZZ, we would get the layout seen in the picture below. The sections (Z coordinate) come one after the other, which is due to the fact that locations are incremented first in X then in Z. This might be what you are looking for, but not if we are trying to represent compartments on a shelf location.
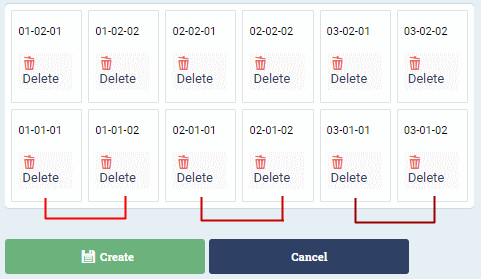
In order to acheive what we actually want, we need to switch X and Z, both in their respective submenus and in the label format. Define the aisle as X = 2, Y = 2, Z = 3, and labeled in the format ZZ-YY-XX. When previewed you can see the locations are now representative of shelf compartments adjacent to one another.
Viewing the warehouse map
If you go to Warehouse ⇒ Warehouse map, you can inspect the warehouse map and see how many items are available in each location:
Editing an aisle
In the warehouse map, there is a link called "Edit" above each aisle:
By clicking it, you are taken to a page which is like the one used above to create a new aisle. You can use this page if you want to add an entirely new section to an aisle.
Example: adding a new section
Let's continue with the aisle FR2 from above. Say we want to add a new section to its right: FR2-A-09, FR2-B-09, and FR2-C-09. We use the warehouse map to edit the aisle, and fill it in like so:
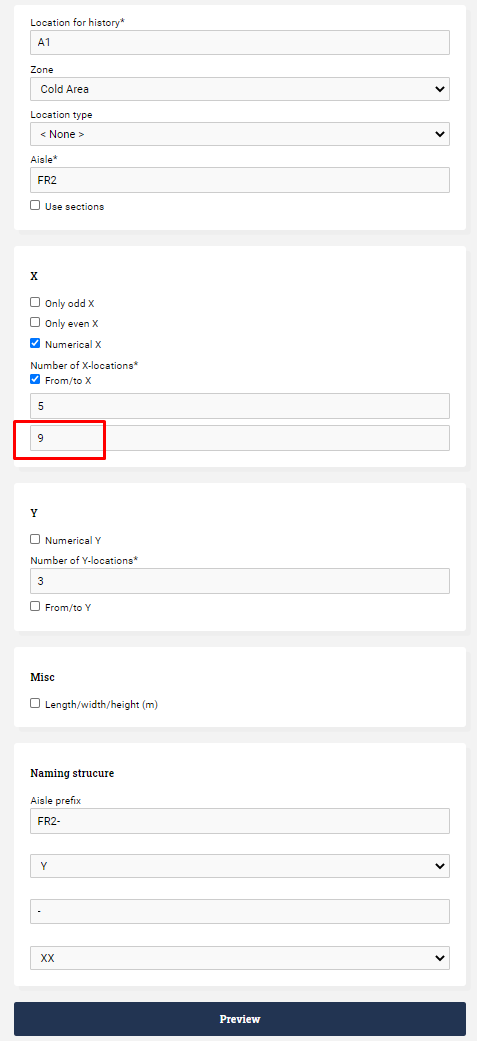
Note that this is almost exactly what we filled in when we created the aisle, except for the last digit of the X locations. Here fill in 9 instead of 8. The system now shows us the difference between how the aisle used to look, and how it will look after the update. When satisfied, we can click on Preview, then Update.

Note: when updating an aisle, the system requires you to fill in a "Location for history". If your changes to the aisle means that a location must be deleted, then the system will first move all goods from the deleted location to "Location for history".
Configuring the locations
After you have created your locations, you may wish to configure them further. For instance, you may want to restrict certain locations so that at most one article can be stored in them.
Location settings
If you go to Administration⇒ Warehouse ⇒ Locations, you can edit each location. The following settings are available:
| Name (English) | Name (Swedish) | Description | Requires goods owner activation |
|---|---|---|---|
| Aisle | Gång | The aisle which the location belongs to. You can use this if you wish to move a location to another aisle. | No |
| Location type | Lagerplatstyp | Determines which type the location has. | No |
| X and Y | X och Y | The position of the location within its aisle. | No |
| Picking priority | Plockprioritet | Used when printing picking lists. The locations are sorted according to their picking priority (from low to high). This allows you to customize the picking route. | No |
| Items in this location are locked | Gods på denna plats är låst | Determines if all goods on the location are locked automatically, so the goods can't be picked. Note that you may still receive goods into a location where "Items locked" has been set. | No |
| Items in this location are locked for sale | Gods på denna plats är låst för sälj |
This option is only available if you have also checked "Items in this location are locked". It is checked by default. If you uncheck "locked for sale", this means that the items are available for refilling picking locations.
Thus, this setting allows you to have two kinds of locked locations: one which contains "goods which may leave the warehouse if they are first moved to a picking location during the refill process", and another kind of location which contains "goods which may not leave the warehouse at all". |
No |
| Only one article item in this location | Högst en godsindivid på denna plats | Restricts the location so that it may contain only 1 article item. Note that this is a very strict condition. | Yes |
| Only one serial number in this location | Högst ett serienummer på denna plats | Restricts the location so that the article items stored in it must have the same serial number. | Yes |
| Only one batch in this location | Högst en batch på denna plats | Restricts the location so that the article items stored in it must have the same batch number. | Yes |
| Default location for at most one article | Plockplats för högst en artikel | Restricts the location so that it can't be the default picking location of two different articles. | No |
| Picking location | Plockplats | This location is intended to be used as a picking location (as opposed to a buffer location). | No |
| Location is out of use | Lagerplatsen är avstängd | You may not receive or move goods to this location | No |
Location type settings
As described above, each location can be assigned to a location type. You can freely create new location types. They are maintained in Administration ⇒ Warehouse ⇒ Location types.
There are settings that can be made on each location type, which are applied to each location of the specific location type. The following location type settings are available:
| Name (English) | Name (Swedish) | Description | Requires goods owner activation |
|---|---|---|---|
| Only one article number in locations of this type | Högst ett artikelnummer på platser av denna typ | If set, this means that you may store at most one distinct article number on locations of this location type. | Yes |
| Only one goods owner's articles in locations of this type | Högst en godsägares godsägares varor på platser av denna typ | If set, this means that you may store articles from at most one goods owner at locations of this location type. Note that you can't set exactly which goods owner is allowed to use the location, only that at most one goods owner at a time may use the location. | No |
Settings which require goods owner activation
In the above list of settings, some settings are marked as "Requires goods owner activation". What this means is that it is not enough for the location or location type to have the setting in question. If you wish the location or location type setting to be applied when working with a certain goods owner, you must also activate it on the goods owner.
To do this, go to Administration ⇒ Goods owners and edit the goods owner in question using the pen icon. Then click on "Advanced" and then on "Activate constraints configured on locations":

Then click on "Update" to save the setting.
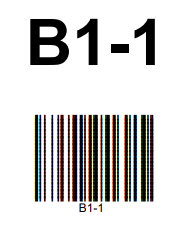
Generating location labels
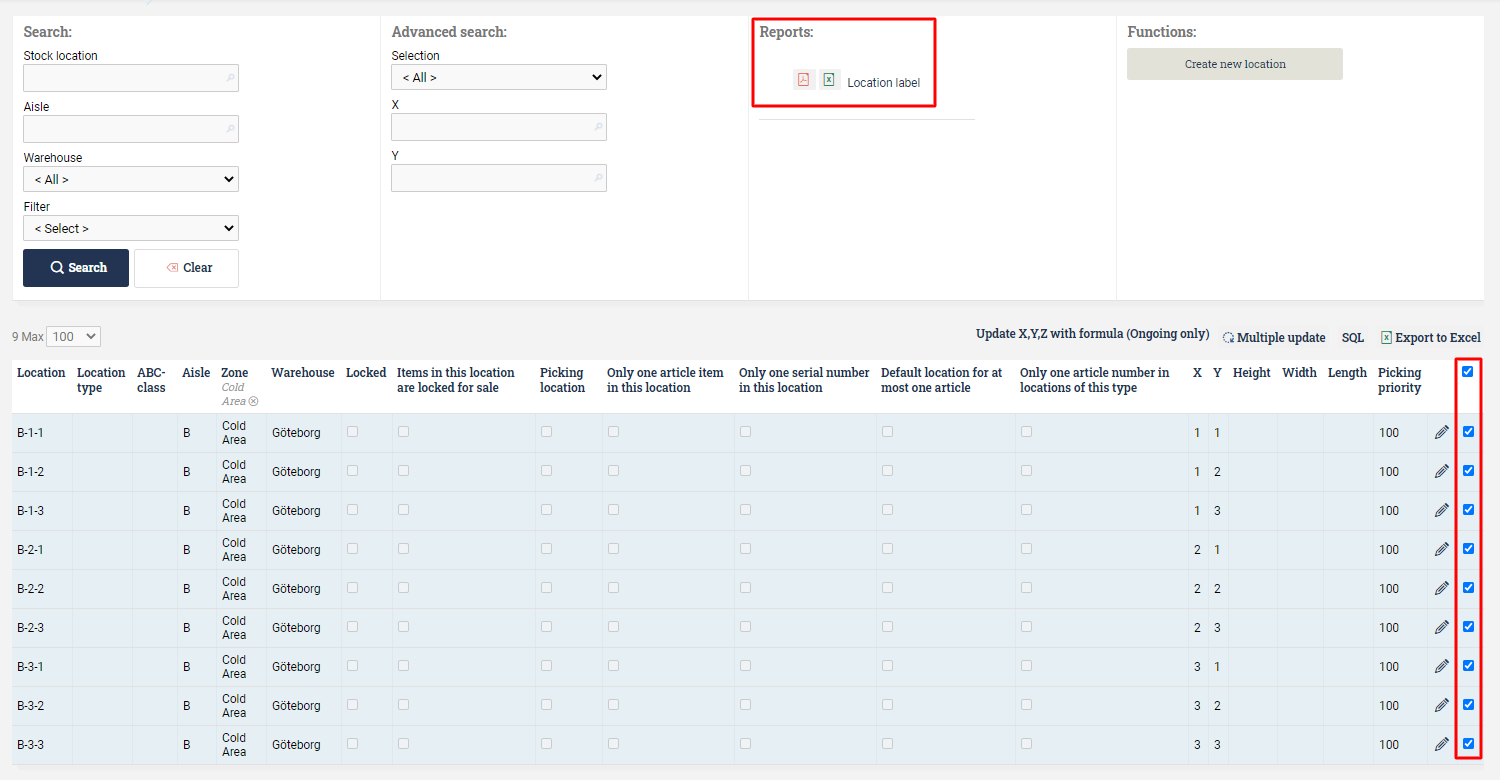
It is possible to generate labels with barcodes for the locations in the new aisle. To do this go to Administration ⇒ Locations. In the rightmost column, mark the locations you wish to generate labels for. To find the locations in a certain warehouse, zone, or aisle you can use the Search function or apply filters in the column headers. Once you have marked the locations, click the PDF or Excel icon.
This will open a new window with the generated labels:
Deleting warehouses, zones, and aisles
To delete a warehouse or a zone, go to Administration ⇒ Warehouses or Administration ⇒ Zones. Click on the Edit icon of the warehouse or zone you wish to delete, then click "Delete" at the bottom of the window.
To delete a warehouse, one must first delete all zones contained in that warehouse, and to delete a zone one must first delete all aisles contained in that zone.
To delete an aisle, go to Administration ⇒ Aisles and click on the Edit icon of the aisle you wish to delete. Tick the box that says "Admin". This makes the "Delete" button appear at the bottom of the window.
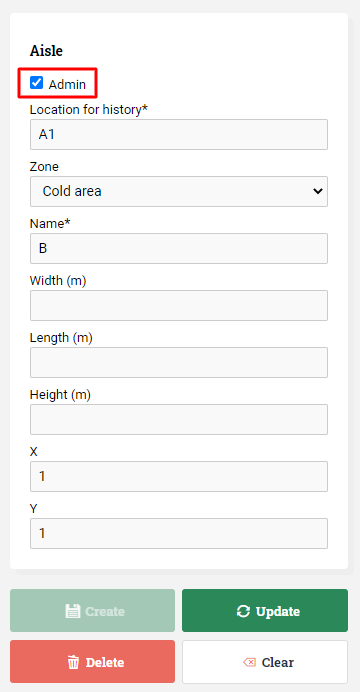
The field "Location for history" also appears and must be filled out before the aisle can be deleted. When you delete an aisle, the system will move all history and goods from the aisle to this location. It is common to have a specific location for this purpose, in the above example the history and goods located in aisle B will be moved to location A1.
Video on creating a warehouse, zones and aisles in Ongoing WMS