Customizable functionality in Ongoing WMS
Table of contents
- Introduction
- Suitable settings for a new user
-
Suitable settings for your dedicated engineer at Ongoing
- Reports such as delivery notes, return labels, etc.
- Printing reports to PDF or to a printer in a specific order for a specific function
- Logic for allocation algorithm
- Logic for picking routes
- Location suggestions when receiving goods
- Changing different standard scannings
- Changing a scanning by settings in the GUI
- Setting up integrations to other systems
- Lock fields on an article so they cannot be updated by an integration
- Additional statistical measures for price lists for thirdparty logistics providers (3PL)
- Custom database queries for columns
- Dashboards in Ongoing WMS
Introduction
In this section some of the already existing functionality in Ongoing WMS is briefly listed and described. A lot of the listed functionality should be activated by your dedicated engineer at Ongoing, and will require a very small cost compared to if it had to be developed from scratch. There are also settings that are suitable for you as an administrator to adjust, which also are listed below.
Note that you can also discuss functionality with your engineer at Ongoing. In many cases they can guide you to a solution that will fit your organization's specific needs.
Suitable settings for a new user
A new admin user in Ongoing WMS can actually change a lot of settings, but we only recommend changing the settings outlined in this section. Then, as you work with your engineer at Ongoing and become more experienced with the system, you may of course try to change the settings outlined in the section Suitable settings for your dedicated engineer at Ongoing too. The most important thing is that you do not break anything in your current functioning logistics flow. Thus, it is always wise to create a test goods owner if you wish to experiment and customize on your own.
Note that all settings you apply are always possible to set on a per user, per user group and per goods owner basis.
Please see this guide on changing general settings in Ongoing WMS.
Changing columns
It is recommended that you yourself show and hide the columns that you wish to see for different list views in Ongoing WMS. The only exception to this is if you will 1) want to add a column that is not already available in the columns list, or 2) want to make calculations on the column content. Then you will have to reach out to your engineer at Ongoing.
Visible fields
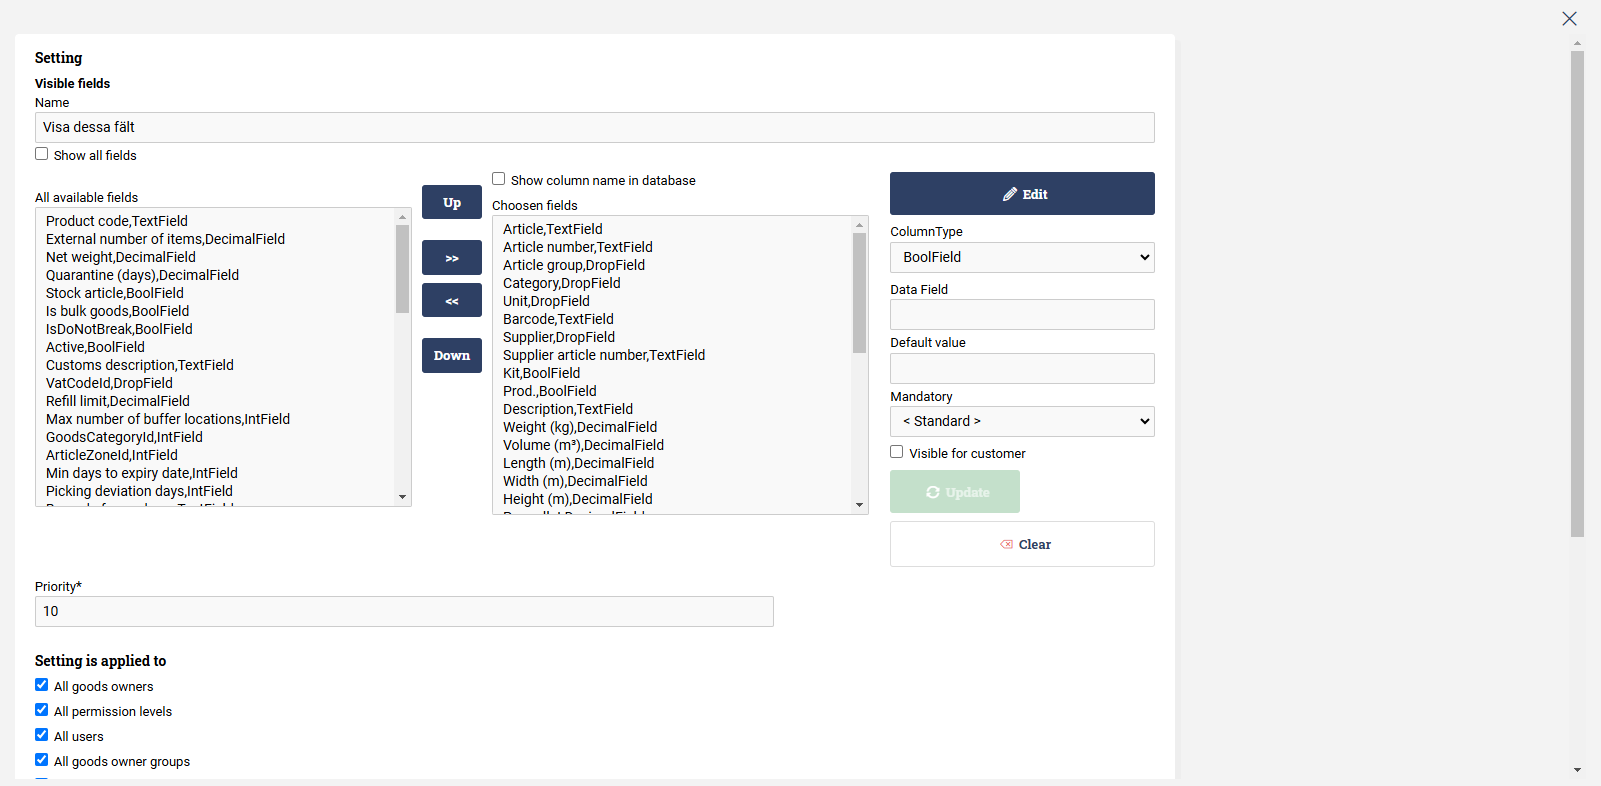
On several pages in Ongoing WMS, there are fields (text boxes, dropdowns, date pickers etc). that can be activated as visible by the user. If such a setting exists, it will be called "Visible fields" (or similar). With this setting you can toggle which fields should be visible. Note that this is only possible where this setting exists, and it is only possible to choose between the fields that exist in that list.
For example, when editing an article on the Warehouse ⇒ Articles page, you can click on the settings cog in the lower part of the edit article dialog, and choose to edit the setting "Visible Fields". The following view will appear:
Suitable settings for your dedicated engineer at Ongoing
Most of the settings in Ongoing WMS are designed to be switched on and off by engineers at Ongoing. They are often complicated to understand fully without expertise and deep understanding of the software. Nevertheless, Ongoing has chosen to make almost all settings fully available for an admin user to increase transparency and to at least give the option for users to become advanced and eventually make customizations on their own—without having to contact your dedicated engineer at Ongoing (thus saving costs, since engineers at Ongoing charge for the time they spend making customizations).
In the subsections below there is always default functionality in place for your instance of Ongoing WMS, but we outline where the functionality can be changed (with the corresponding setting) and provide a little more info on what is available. This serves to give you more transparency on how Ongoing WMS can be customized to the needs of your warehouses.
Reports such as delivery notes, return labels, etc.
The reports in Ongoing WMS refer to those places where you can print or download a PDF or Excel file, indicated with the heading "Reports". For example, in the order list there is usually a set of reports that typically can look like this:

Printing reports to PDF or to a printer in a specific order for a specific function
It is possible to automatically print reports in Ongoing WMS, either to PDF or directly to one or more printers, or both. If automatic printing feature is not active, you can read this guide to learn how to activate automatic printing. The automatic printing is then set up in the page settings. An introductory guide on where the page settings are located and how they work can be found in our page on page settings.
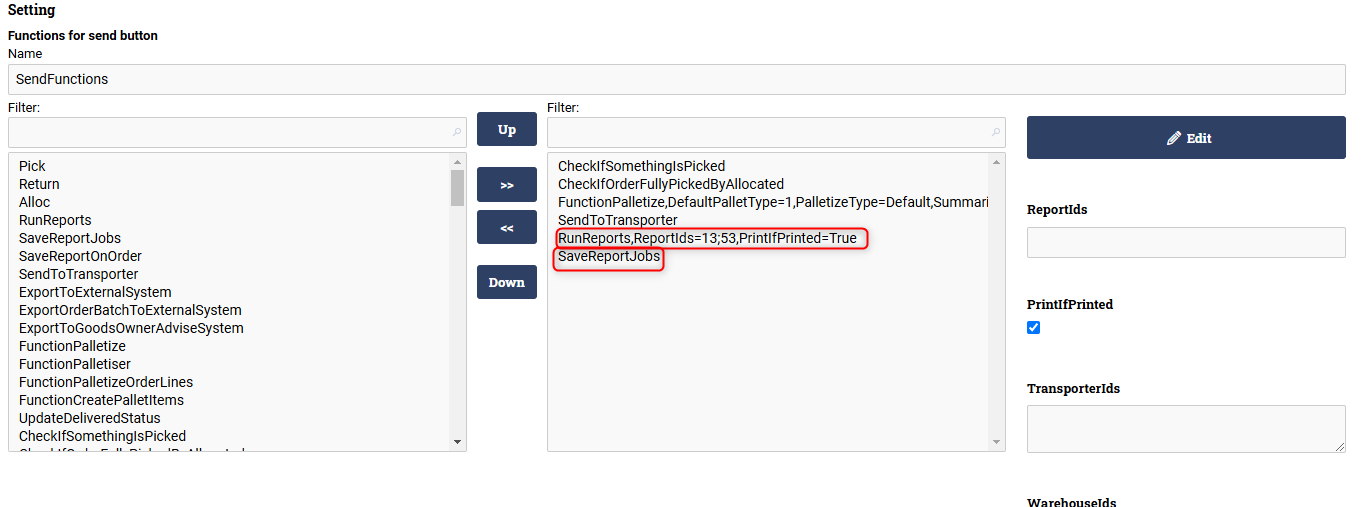
It is possible to change the order and what reports should be printed when clicking for example a button. The most common scenario is to print reports when clicking different buttons in the order list, or when pressing the "Send" button in the scanning interface. To change the behaviour on what reports to print and in what order, go to the Order ⇒ Order list page and click the settings cog. Edit, copy or create a new button setting for the appropriate button. For changing the behaviour of the send button, edit the setting called "Functions for send button". Note that any automatic printouts that you add on this setting, are the ones that will be printed when you click the "Send" button also in the scanning interface.
For adding reports to be printed through automatic printing, you will need to move the field called "SaveReportJobs" to the righthand list.
To change the behaviour and what should be printed, for any of the other buttons, simply repeat the above scenario and look for the appropriate setting. For example, in the setting "Functions for pick button" you can add printouts for other reports such as a pick list.
Logic for allocation algorithm
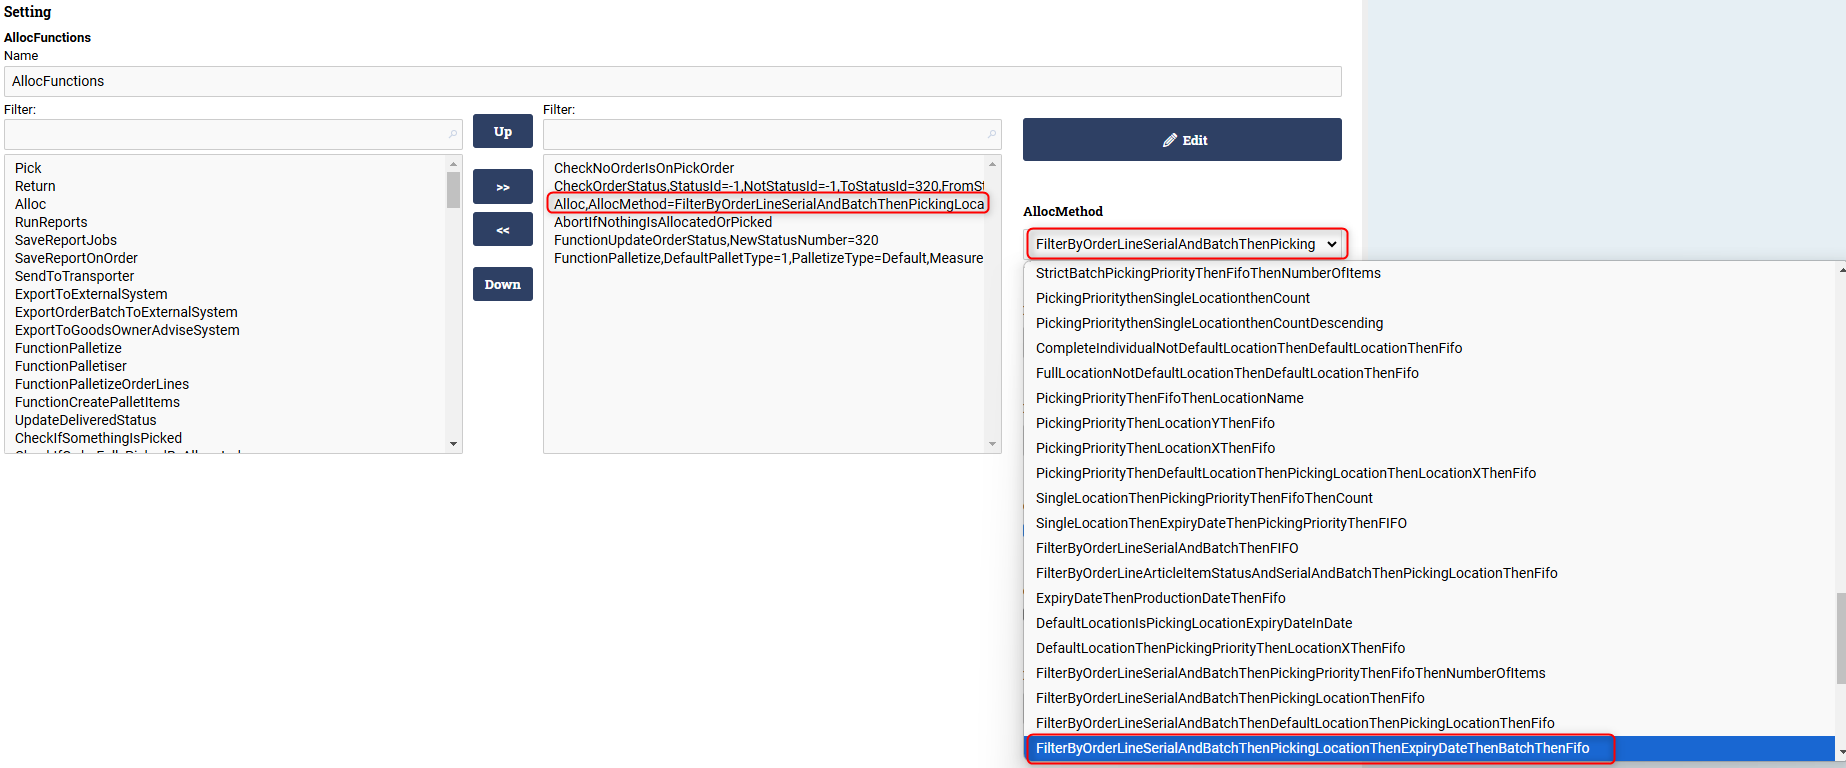
The standard allocation logic in a new instance of Ongoing WMS is based on First In First Out (FIFO). There are many more allocation logics to choose from, but it is strongly advised that any changes be made by your engineer at Ongoing. In principle, you just need to communicate how you wish your goods to be allocated, and Ongoing can get it done for you.
Should you wish to experiment with setting this logic yourself, you can go to the order list at Order ⇒ Order list, click on the settings cog, and edit the setting "AllocFunctions". Then, edit the function called "Alloc" and choose the allocation algorithm from the "AllocMethod" dropdown. The name of the algorithm reflects how the goods are allocated, but it is not always completely clear. Ongoing also has even more readymade allocation logic than is shown in that list, so it is likely that all or parts of your specific scenario has already been developed.
Logic for picking routes
As of February 2025, the standard logic for picking routes in the warehouse for new instances of Ongoing WMS is as follows:
- Locations are ordered by their picking priority. Lower priority value goes first.
- Aisles are ordered by their assigned X-values. Lower X-values go first.
- The route follows the aisles in alphanumeric order by name.
- Locations are then sorted first by their X and then by their Y positions.
- Finally, if there are still ties, the system uses the article name and article number to determine what to pick.
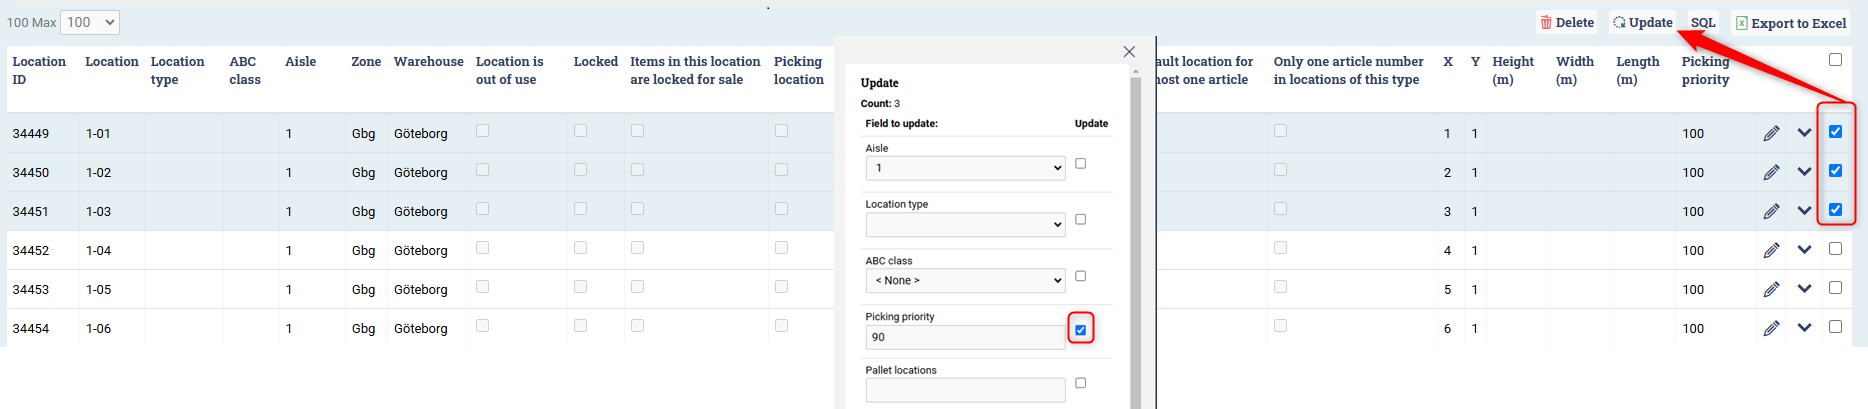
One straightforward way to alter the picking route logic is to change the picking priority for a whole aisle or for individual warehouse locations. Lower value on priority means that a location will be picked before a location with a higher priority value. To change the picking priority of multiple locations at once, go to Administration ⇒ Locations and select the locations for which you wish to set a different picking priority. Then click "Update". In the new window that appears, set a picking priority, click the checkbox next to it, then scroll down and click the "Update" button.
Another way to change the picking route is to set the X value on your aisles. A lower X value is picked first. This is changed in a similar manner as for warehouse locations under Administration ⇒ Aisles. The column called "X" shows the X value for the aisle.
Location suggestions when receiving goods
Ongoing WMS has many different options for suggestions on where to place the goods upon receiving it. For a newly created system, the default behaviour is for Ongoing WMS to give the suggestion on placing the goods on an articles picking location, if such a location exists. The picking location is set on an article on the page Warehouse ⇒ Articles.
To see the location suggestions Ongoing WMS can give, go to the page Warehouse ⇒ Receive goods and check the checkbox "Show location suggestion". The dropdown shows the different options available for a newly created system. To get a suggestion, click the button called "Suggest".
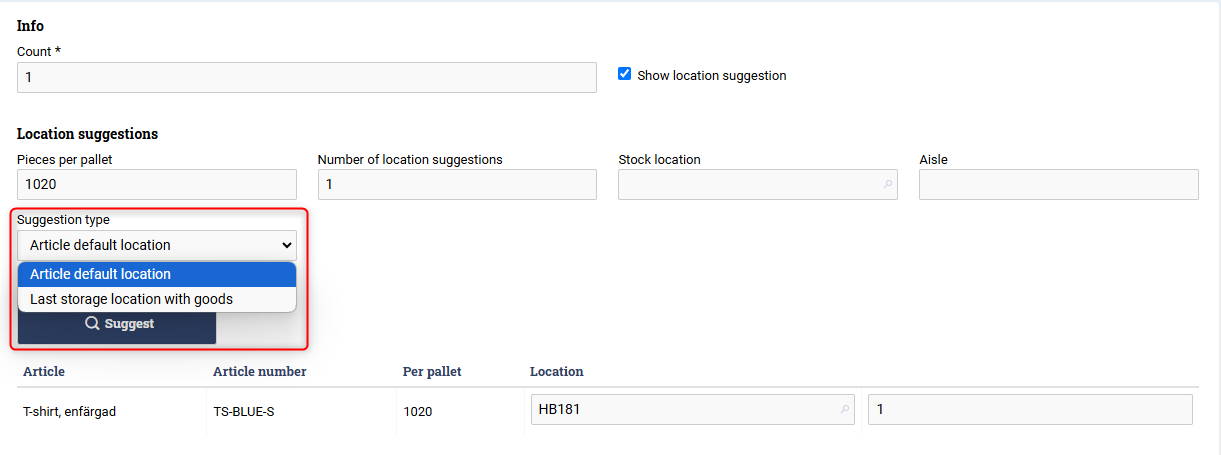
To add more options to this list, click the settings cog on the page Warehouse ⇒ Receive goods and edit the setting called "BatchListLocationSuggestionType". To add more suggestions, simply move fields from the lefthand side to the right, using the arrows.

Note that the first option in the righthand list is what will be suggested for an article, when inbounding it using the scanning interface.
Changing different standard scannings
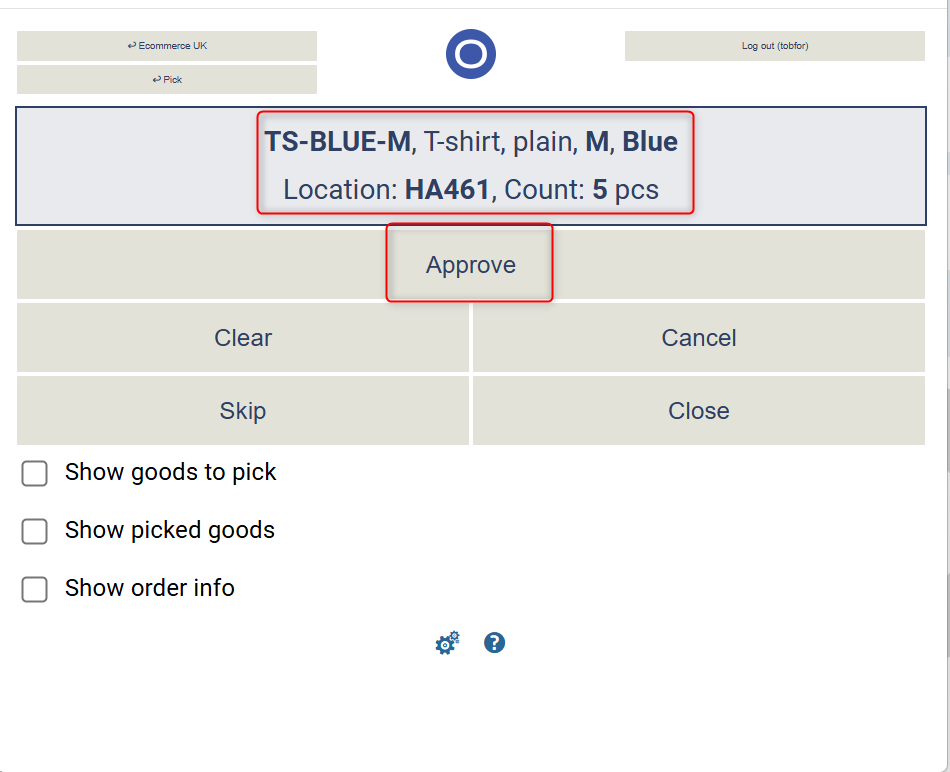
Changing the standard scannings for picking goods should be done by your designated engineer at Ongoing. There are many different readymade scannings to choose from. For example, in a new instance of Ongoing WMS a single outbound picking of an order consists of scanning first the warehouse location, then the barcode of the article, and then entering the quantity. Once this is done, the user is automatically transferred to the packing interface. All this can be changed according to your specific needs, and it is likely that one of the many different standard scannings encompasses your specific scenario.
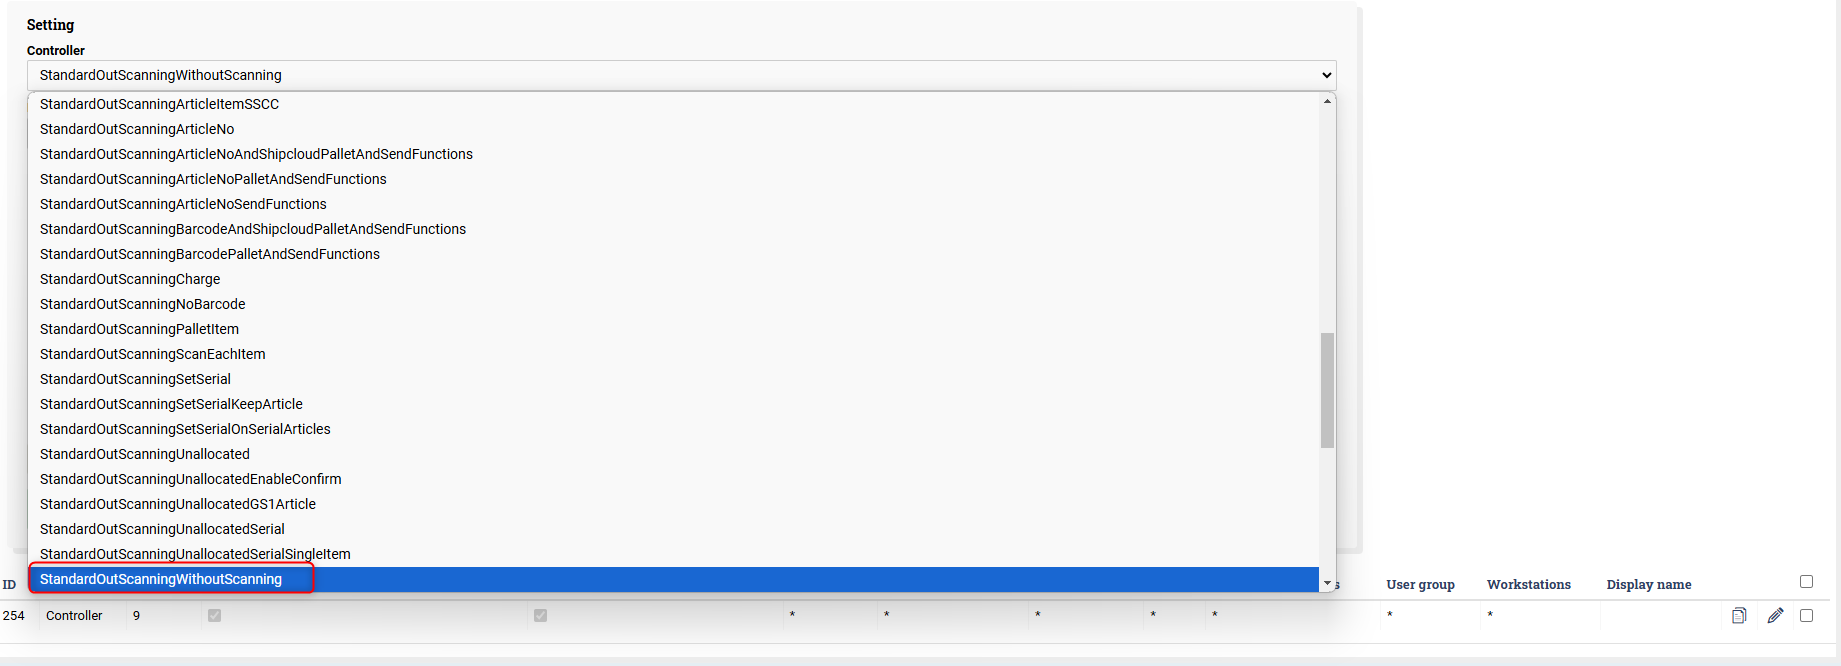
To take a look at the many different scannings that exist for picking a single order, go to the scanning interface, click on the "Pick" button, then click the settings icon, and edit the setting "Controller". As can be seen in the dropdown list, the name does not necessarily reflect the steps that the scanning process will include. There are a few exceptions, though. For example, if you do not wish to scan anything on an order, you may choose the option "StandardOutScanningWithoutScanning".
In a similar fashion, you can view different scannings for other processes—for example, the "Inbound (order)" option in the scanning interface for inbound processing against a purchase order.
Changing a scanning by settings in the GUI
Modifying the scanning steps for some scannings can be done directly from the GUI in the Ongoing WMS admin interface. In general, a scanning is configurable by settings in the GUI if the corresponding scanning controller name is ending with "bySettings". The controller of a scanning can be changed from the scanning page in the scanning interface or from the GUI at the Administration ⇒ Scanning page. Reaching the actual settings page for a controller that is configurable by settings (as the example in the image below) is done by creating a new setting from the scanning page in the admin interface. Even though some scannings are configurable in the GUI of Ongoing WMS, we recommend consulting with your dedicated engineer at Ongoing to get exactly the behavior that you need.
To get a better understanding of how scanning configurations work, read this guide.
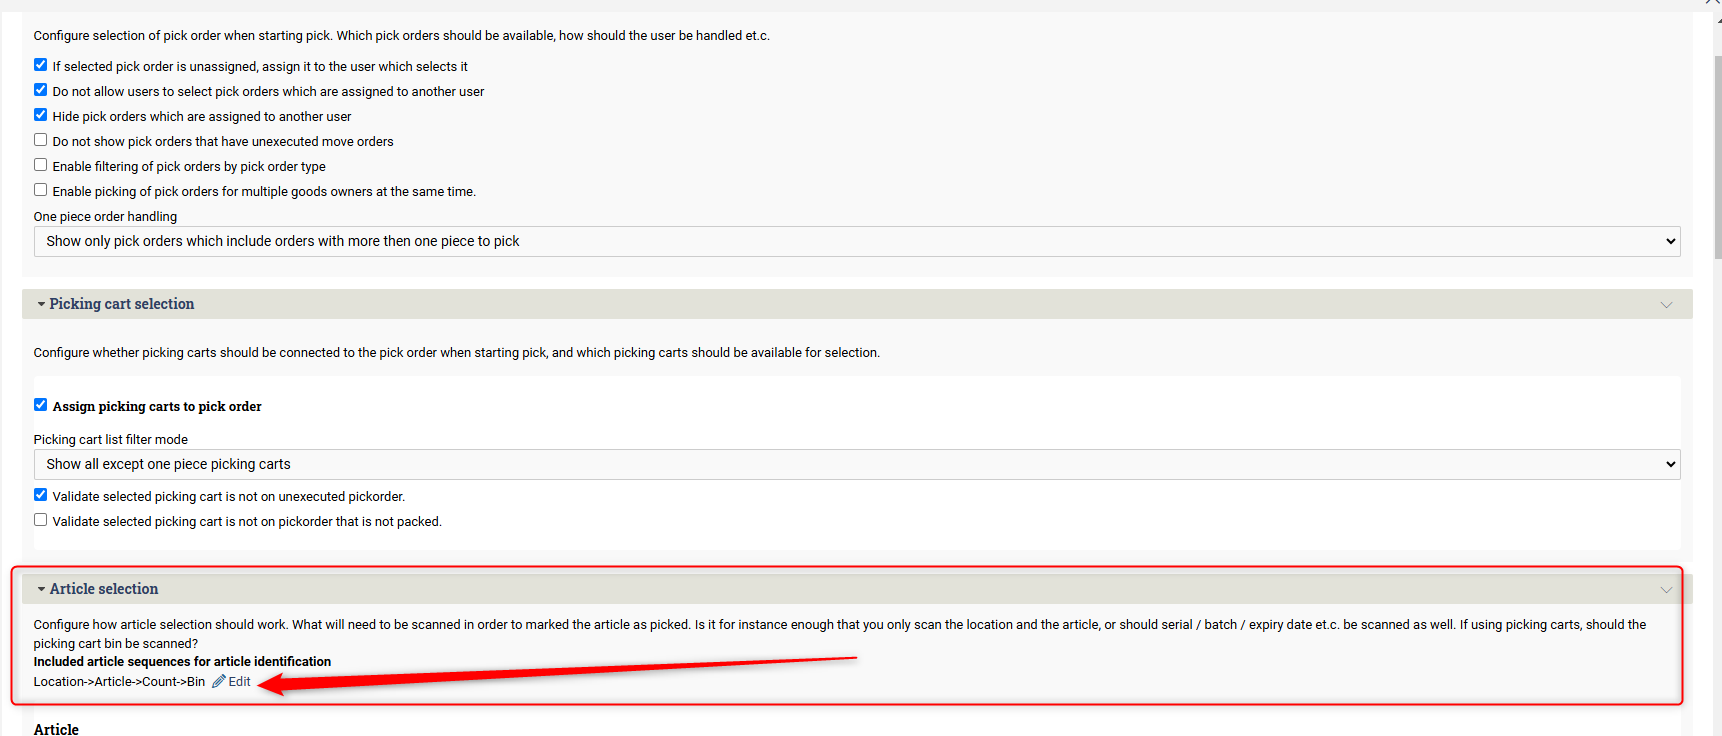
To review the different scannings that are configurable by settings, go to the Administration ⇒ Scanning page. For example, here you can choose either of the options for batch picking: "Batch picking in many bins" and "Batch picking in one bin". One suitable setting for you to edit is determining when an article should be marked as picked. Click the edit button for "Article selection" and move items to and from the rightmost list using the arrows. All these steps must be completed before an article is considered picked. The default behavior for "Batch picking in many bins" is to scan the location, the article, input a count, and then scan the bin of the picking cart. This can also be seen on the settings page below:
Setting up integrations to other systems
Depending on which party built an integration, it is either set up from within Ongoing WMS or through an external system. All integrations built by Ongoing are set up in Ongoing WMS—except for systems using the OAuth flow, which are instead set up through the complementing system's app store. Performing that process will take you from the app store to the integration page for the system inside Ongoing WMS. To get all the settings right, we strongly recommend consulting your engineer at Ongoing to discuss the needs of the particular integration you wish to set up.
There are many guides on how to set up integrations to different types of systems, they can be found in the separate "Integrations" section on our "Manuals & Guides" page.
Lock fields on an article so they cannot be updated by an integration
In certain scenarios, you may wish that an integration does not update certain fields on an article/product once the integration is run. Typically, an integration only updates those fields it has values for, and the default behavior is that all those fields are updated in Ongoing WMS when the integration runs. Note that this is applicable only for integrations that updates articles, so most commonly through webshop/ERP integrations or via any custom integrations you may have through Ongoings API.
Locking fields for updating is straightforward, but it is recommended to consult your engineer at Ongoing prior to changing this. The setting can be found on the page Administration ⇒ Integrations and is called "ArticleFieldsUpdateConfiguration". Reach it by clicking the settings cog on the Administration ⇒ Integrations page, click the "New setting" button, and then click the plus sign next to "ArticleFieldsUpdateConfiguration". Move fields to the right that you do not want an integration to update. This setting should likely be applied on a per goods owner basis; otherwise, it will be applied for all integrations you may have for your different goods owners.
Additional statistical measures for price lists for thirdparty logistics providers (3PL)
If you represent a 3PL company, we have a guide on how to set up price lists and charges for your clients, so that Ongoing WMS can automatically calculate what to charge your clients for storage, picking orders, and other services. On the page Economy ⇒ Price list and in the "Create new charge" section you can find the existing list of statistical measures—if you click the checkbox "From statistics". There exist many more charges than those shown here that have been developed by Ongoing for customers over the years. However, this is something that only staff at Ongoing can change, so in this case you must consult your engineer at Ongoing. As usual, if you describe the type of charge you want, it is likely that this charge—or parts of it—already exists.
Custom database queries for columns
If, in any list view in Ongoing, you cannot find the field/column you are looking for, it is likely that it can be arranged. This will require some custom development from your engineer at Ongoing, so you will need to contact us and explain what it is that you want.
If you want to make calculations on a field/column value or mix input from several columns, this can also likely be arranged by consulting your dedicated engineer.
Dashboards in Ongoing WMS
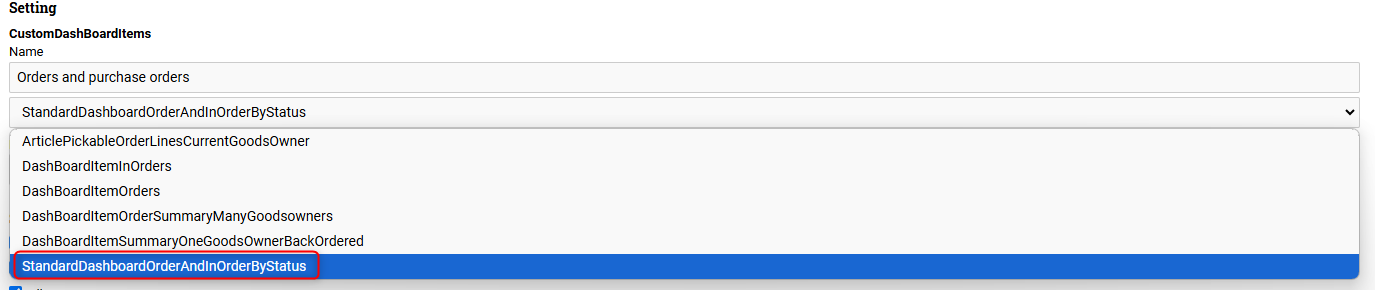
On the Statistics ⇒ Dashboards page there is by default only one standard dashboard, which you may find in the dropdown list. We recommend discussing your needs for a dashboard with your designated engineer at Ongoing. Note that visualizing data in a manner similar to many BI tools is not Ongoing's area of expertise. The dashboards can be viewed in fullscreen on a standalone web client in the warehouse, such as on a TV. They typically refresh every two minutes.
If you are interested in exploring the other dashboards available, simply click the settings cog and edit the setting "CustomDashBoardItems". The different ones that already exist can be changed using the dropdown list.