Page settings
Table of contents
Introduction
Each page in Ongoing WMS has settings which control the behavior of the page in various ways. The most common setting is a column setting which controls which columns are displayed in the various tables on page. For instance, when you go to the order list, you see a table consisting of all orders. By changing the column setting, you can display exactly the information you want to see for each order (e.g. post code, country, customer name).
Accessing the settings
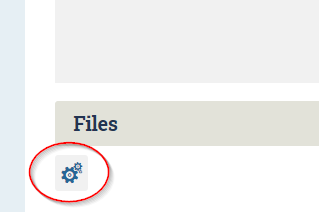
You access the settings for a particular page by clicking on the cog icon. The cog icon is usually located at the very bottom of the page, close to the Ongoing WMS logo:

Some settings are accessed via a cog icon which is located at the at the bottom of a sub-page:
When you have clicked on the cog icon, you will be presented with a new page where you can see the existing settings, edit existing settings and add new ones.
Settings overview
Existing settings are shown as rows on the settings page. Among the columns are:
- setting The type of the setting. This indicates what the setting concerns.
- priority Used to rank settings when several different instances of the same setting exists. A lower number gets higher priority.
-
Several fields telling who the setting is applied to. A * means that the setting is applied to all.
- username
- permission levels
- goods owner
- group
- goods owner classes
- user group
- workstations
- display name Custom name of the setting
- by The user who most recently edited the setting
Create, edit or copy a setting
Existing settings can be edited via the pen icon, or copied via the document icon. A copy creates a new instance of the same setting and allows you to make adjustments to that new instance. If the setting does not exist in the list you can create a new one via the New setting button at the top of the page. You'll then begin by selecting the type of setting you want.
For further guideance, see the examples of how to set up some common settings further down on this page.
How to select and customize options from a list
Settings have different input interfaces depending in the type. One such interface are two paralell lists where you can move the entries back and forth between the lists. In this interface the left list contains the possible options, and the right list the options that your setting will apply.
- To add a new option to the setting, click on it in the left list and then click on the > > button.
- To remove an option from the setting, click on it in the right list and then click on the < < button.
- Some options allow for further customization. Select the option in the right list and press the Edit button to the right. Make any adjustments, and press the Update

Prioritization
It is possible to add several different instances of the same setting. This allows you to apply different settings to different users. The way it works is that each setting has a priority. When the system wants to figure out exactly which setting instance to apply, it does the following:
- The system finds all setting instances.
- It disregards the ones which are not applicable to the current user and goods owner.
- It sorts the settings by priority.
- The setting with the lowest priority is the one which is applied.
As an example, consider these three instances of the same column setting, with priority 6, 8 and 10 respectively:

The setting with priority 6 is applied only when administrator users are looking at the goods owner called Training.
The setting with priority 8 is applied to all other users when they are looking at the goods owner called Training.
Tee setting with priority 10 is applied in all other cases. It functions as a default setting.
Examples
More in depth guides on how to set up some common settings.Changing column settings
Edit, copy or create a new column setting. The settings that control which columns are displayed usually has the word "Columns" in their name, like "Order list columns." When you create or change a column setting, you will be presented with the following page:
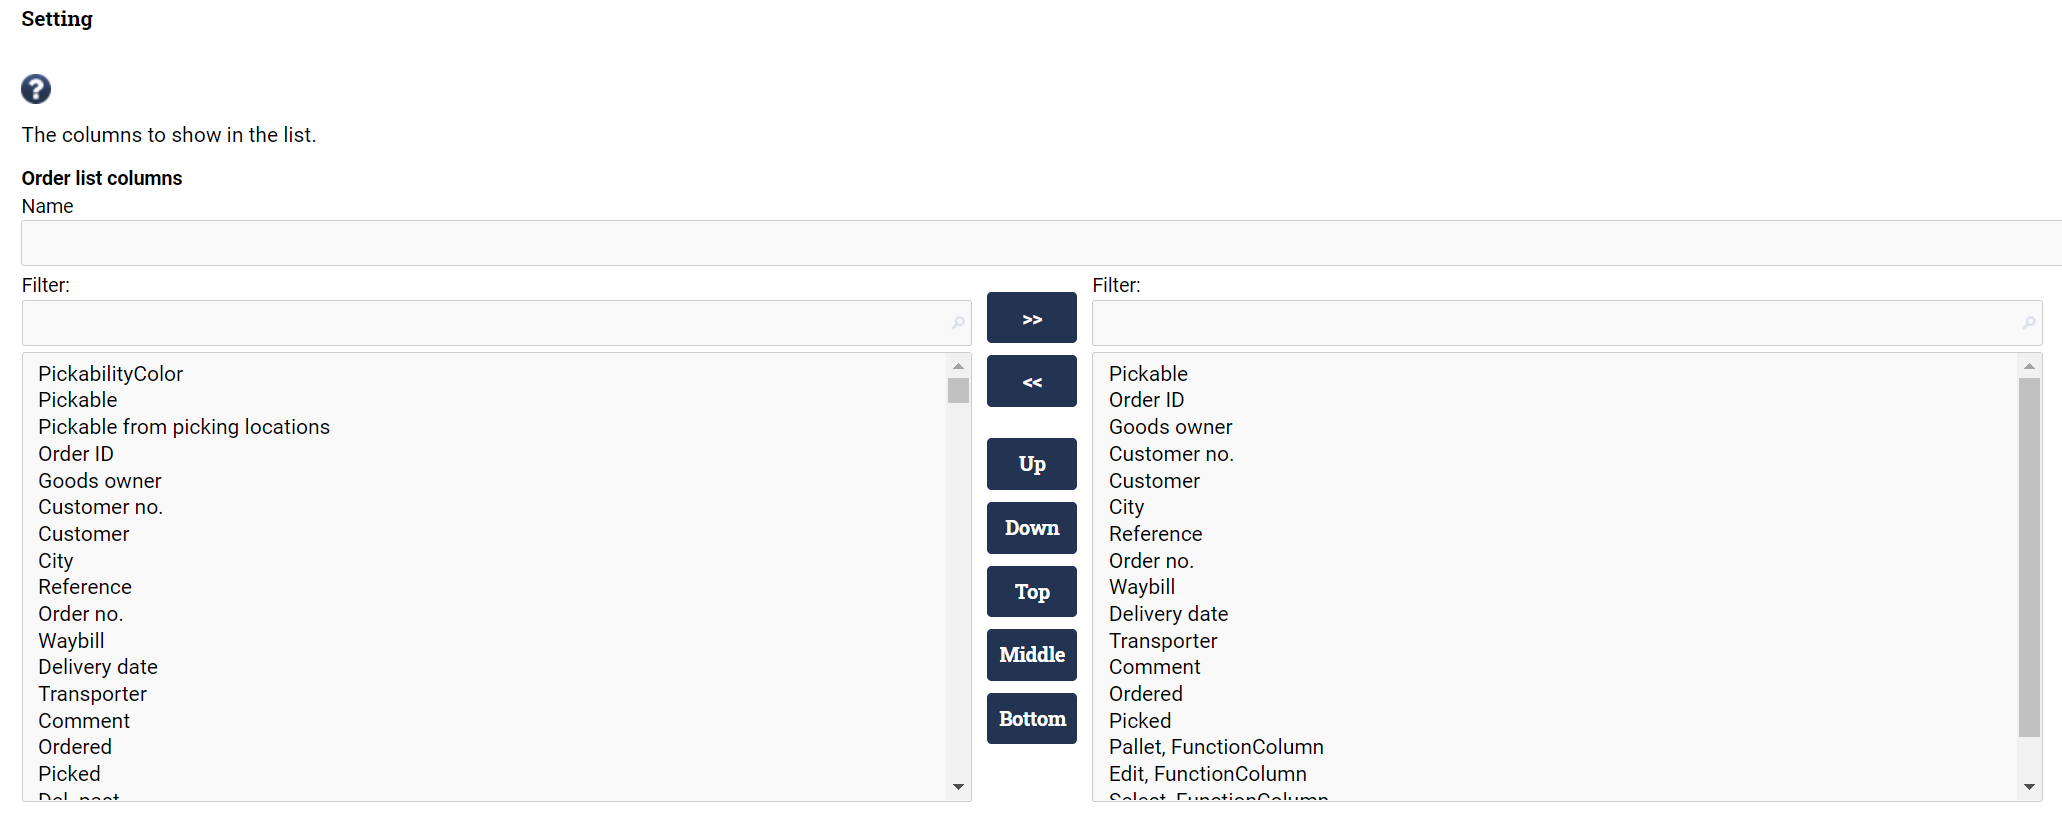
To the left, there is a list of all possible columns. To the right, you see the current columns in the setting.
To add a new column to the setting, click on it in the left list and then click on the > > button.
To remove a column from the setting, click on it in the right list and then click on the < < button.
To change the order of the columns, click on a column in the right list and then use the Up and Down buttons to move the column to the correct position. You can also use Top, Middle and Bottom to move column to the top, middle or bottom.
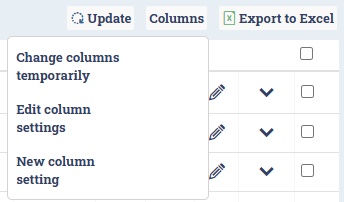
Tip: There is a Columns button in the order list that can be used to quickly create or update a column setting. From here it is also possible to change the current columns temporarily. This is useful if you want to view specific order fields, without changing the actual setting. The temporary columns will be reset when you leave the page.
Printing reports to PDF or to a printer in a specific order for a specific function
Want to print certain reports when pressing a button, such as send, allocate or pick? See this guide on customizable functionality