Importing data from Excel
Table of contents
- Introduction
- Video
- Basic procedure
- Example import files
- Stop Excel from incorrectly reformatting values
Introduction
Different types of data can be imported into Ongoing from Excel:
- Basic article data: information about article numbers, weights, volumes, barcodes, and so on.
- Orders: information about order lines, various order references, delivery addresses.
- Purchase orders: information about purchase order lines, various purchase order references, supplier addresses.
- Production orders: information about production order lines.
- Customers: customer numbers and associated addresses.
- Goods reception: perform a goods reception, that is, receive X number of items into location Y.
- Suppliers: information about suppliers (name, number, address).
- Kit articles: if you have kit articles (articles which are defined in terms of other articles), you can import the definition of the kit article.
- Movement orders: perform a goods movement from location X to location Y.
The system supports both Excel files (.xlsx and .xls) and CSV files (.csv, encoded in ISO-8859-1). This guide gives a general overview of how the import process works, and also gives specific examples for each type of import.
Video
The following video shows how to import articles from an Excel file.
Basic procedure
Importing always follows the same basic procedure, regardless of which type of data is being imported.
Step 1: Go to the correct import page
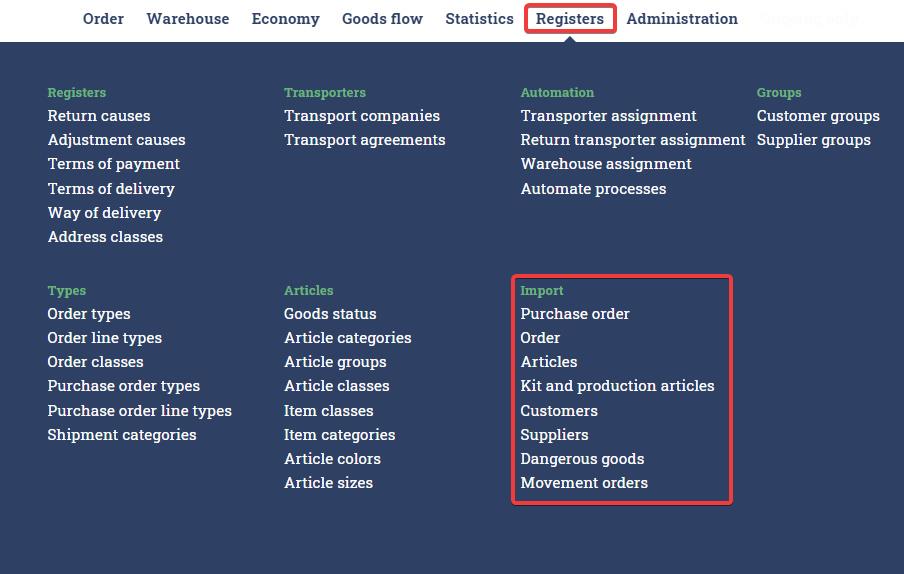
Go to Registers ⇒ Import and click on the type of thing you want to import:
Step 2: Download the template file
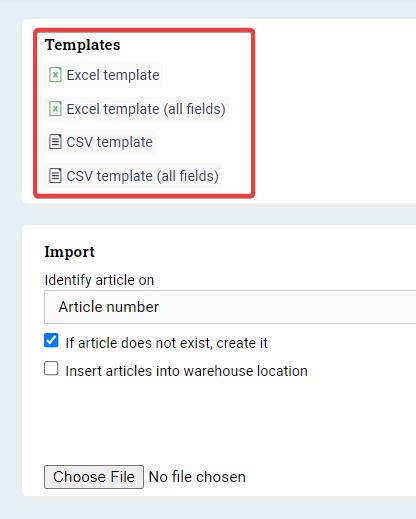
Each type of import has its own template. If you don't already have the file, you can download it by clicking on "Excel template" in each import page:
Step 3: Enter data into the template
Open the template file in Excel and enter data. Save the file when you are done.
Step 4: Upload the file
In each import page, there should be a button called "Choose file", "Select file", or something similar depending on your language. Click on it. A new window should appear where you can select your file.
Step 5: Verify that the system has interpreted the file correctly
First verify that the system has identified the columns correctly. The system will try to guess the columns by using their names. If the system cannot identify a certain column, it will be shown as red.
In the example below, a file has been uploaded where one of the column names was called "article number". Due to the misspelling, the system was unable to match this to a known column. You can either fix this in the file and upload the file again, or you can manually select the correct column directly in the import page.

After the columns have been verified, verify that there are no errors in the data rows. The rows will have different statuses depending on what is going on:

There are three cases:
- If a row has the information icon as its status, then there is something wrong with it. If you put your mouse on the icon, you will see a message which explains what is wrong. In the above example, the error is because article number has not been filled in. Note that rows with this status will not be processed when you press Import.
- If a row has status "Updated", it means that there is existing data in the system which will be updated if you process the file. In the above example, the second row has status "Updated" because the system already contains an article with article number 123123.
- If a row has status "New", it means that it is okay to process and that the data is new. In the above example, the third row has status "New" because the system does not yet contain an article with article number 111111.
Step 6: Finish
Press Import to finish. Afterwards, if there were errors, the row will have the info icon as its status and the row was not imported. If there were no errors, the status of the row will change to "Imported".

Example import files
Here we provide some simple example files for each type of import.
Basic article data
Click here to download the article import example file. Each line in the file contains the article data for one specific article. In this example file, there are two articles:
- An article with article number "A1" and weight 1 kg.
- An article with article number "A2" and weight 2 kg.
To import the file:
- Go to Registers ⇒ Import ⇒ Article.
- Make sure that Insert articles into warehouse location is NOT checked.
- Upload the file.
- Press Import.
Orders
Click here to download the order import example file. Each line in the import file represents one order line. Note that data which belongs to the order header must be repeated for each line. This means that e.g. the delivery address must be repeated for each line. You can have several different orders in the same file.
In the example there are two orders in total and five order lines in total:
- The first three lines represent an order to TestPerson1. There are three order lines: 1 piece of A1, 2 pieces of A2, and 3 pieces of A3.
- The last two lines represent an order to TestPerson2. There are two order lines: 10 pieces of A1 and 20 pieces of A2.
To import the file:
- Go to Registers ⇒ Import ⇒ Orders.
- Upload the file.
- Press Import.
Purchase orders
Click here to download the purchase order import example file. Each line in the import file represents one purchase order line. Note that data which belongs to the purchase order header must be repeated for each line.
In the example there are two purchase orders in total and five purchase order lines in total:
- The first three lines represent purchase order 1234. There are three purchase order lines: 1 piece of A1, 2 pieces of A2, and 3 pieces of A3.
- The last two lines represent purchase order 6789. There are two purchase order lines: 10 pieces of A1 and 20 pieces of A2.
To import the file:
- Go to Registers ⇒ Import ⇒ Purchase orders.
- Upload the file.
- Press Import.
Customers
Click here to download the customer import example file. Each line in the import file represents one customer. There must be a unique customer number for each line.
In the example there are two customers:
- TestCustomer1 with an address in Sweden.
- TestCustomer2 with an address in Norway.
To import the file:
- Go to Registers ⇒ Import ⇒ Customers.
- Upload the file.
- Press Import.
Production orders
Click here to download the production order import example file. Each line in the import file represents one production order line. Note that data which belongs to the production order header must be repeated for each line.
In the example there are two production orders in total and five production order lines in total:
- The first three lines represent purchase order Prod1234. There are three production order lines: 1 piece of A1, 2 pieces of A2, and 3 pieces of A3.
- The last two lines represent purchase order Prod6789. There are two production order lines: 10 pieces of A1 and 20 pieces of A2.
To import the file:
- Go to Registers ⇒ Import ⇒ Production order.
- Upload the file.
- Press Import.
Customers
Click here to download the customer import example file. Each line in the import file represents one customer. There must be a unique customer number for each line.
In the example there are two customers:
- TestCustomer1 with an address in Sweden.
- TestCustomer2 with an address in Norway.
To import the file:
- Go to Registers ⇒ Import ⇒ Customers.
- Upload the file.
- Press Import.
Goods reception
Note: If you do several goods receptions using Excel, the effect is cumulative. That is, if you use the import to first perform a goods reception of 5 pieces of article A1, and then do another goods reception for 3 pieces of A1, then the system will contain 8 pieces of A1.
Click here to download the goods reception import example file. Each line must contain the article number, the quantity, and the location.
The example file contains the following:
- 5 pieces of article A1 in location L1.
- 7 pieces of article A2 in location L2.
To import the file:
- Go to Registers ⇒ Import ⇒ Article.
- Make sure that Insert articles into warehouse location is checked.
- Upload the file.
- Press Import.
Suppliers
Click here to download the supplier import example file. Each line in the import file represents one supplier. In most cases, you will want to assign each supplier a unique number in the "supplier number" column.
In the example there are two suppliers:
- TestSupplier1 with an address in Sweden.
- TestSupplier2 with an address in Norway.
To import the file:
- Go to Registers ⇒ Import ⇒ Suppliers.
- Upload the file.
- Press Import.
Kit articles
Kit articles (or structure articles) are articles which are defined in terms of other articles. We have a guide which explains in more detail how to work with kit articles
When you import kit articles from Excel, you are importing the kit article definitions. That is, you are telling the system which sub-articles each kit article is comprised of.
Click here to download the kit article import example file. Each line binds one sub article to one kit article. The articles involved must already have been created in the system, for example through the basic article data import. Enter the identifying data for the kit article and the sub article, and the amount of the sub article to be required for each instance of the kit article. Leave the other fields blank.
The example file contains the following:
- 4 pieces of article A2 is included in the kit article A1.
- 2 pieces of article A3 is included in the kit article A1.
To import the file:
- Go to Registers ⇒ Import ⇒ Kit and production articles.
- Choose which field to identify articles by (Article number for this example file).
- Upload the file.
- Press Import.
Update article items
Click here to download the update article item import example file. Each line in the import file represents an article item. The ArticleItemId has to exist in the article register to update the specific article item.
The example file contains the following:
- 2 article items. Each article item (if it exists) will get updated.
The fields that are currently supported are:
- Expiry Date
- Production Date
- Batch Number
- Serial Number
To import the file:
- Go to Registers ⇒ Import ⇒ Update goods info.
- Upload the file.
- Press Import.
Movement orders
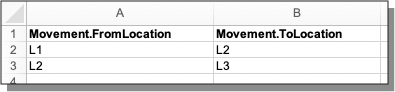
Click here to download the movement orders import example file. Each line in the import file represents an article. For each article, an article number, product code, or barcode is to be filled out along with the number of article pieces that are to be moved. Next, fill out the current location and the new location to where the pieces of article are to be moved.
The example file contains the following:
- 5 items with article number A1 is to be moved from location L1 to location L2
- 7 items with article number A2 is to be moved from location L2 to location L3
The import file can be filled out in three different ways:
- Move a specified number of items for a specified article from location X to location Y. On each row, enter the article number, product code or barcode, along with the number of items that are to be moved. Specify the two locations the goods are to be moved between.
- Move all items for a specified article from location X to Y. On each row, enter the article number, product code or barcode that is to be moved. Specify the two locations the goods are to be moved between. Leave out Movement.NumberOfItems.
- Move everything from location X to location Y. On each row, only specify the two locations the goods are to be moved between.


To import the file:
- Go to Registers ⇒ Import ⇒ Movement orders.
- Specify which field to identify the articles by (Article numbers, Product codes or Barcodes).
- Import the file.
- Press Import.
Dangerous goods
Click here to download the dangerous goods import example file. Each line in the import file represents an article. For each article, necessary dangerous goods information can be filled out. The fields UNNumber, Class and PackageType are mandatory to be filled in. If an article is not already created, it will be when using this import.
The example file contains the following:
- One article item with only the mandatory fields filled out.
To import the file:
- Go to Registers ⇒ Import ⇒ Dangerous goods.
- Specify which field to identify the articles by (Article number or Product code).
- Import the file.
- Press Import.
Stop Excel from incorrectly reformatting values
Sometimes, you may run into problems with data not being saved in the right format in Excel, giving you incorrect values when importing your Excel file into Ongoing. Examples of these formatting errors include:
- Long numbers being converted to scientific notation, i.e., 123456789123456 ⇒ 1,23457E+14.
- Strings of text that look like dates being saved with 00:00:00 appended, i.e., 2000-01-01 ⇒ 2020-01-01 00:00:00.
To avoid problems like these, you can tell Excel not to convert your text. This can either be done on a per-cell basis by putting an apostrophe at the start of the cell (i.e., writing '123456798123456 instead of 123456798123456), or by changing the settings of one or more columns according to the instructions below.
Step 1: Select the appropriate columns
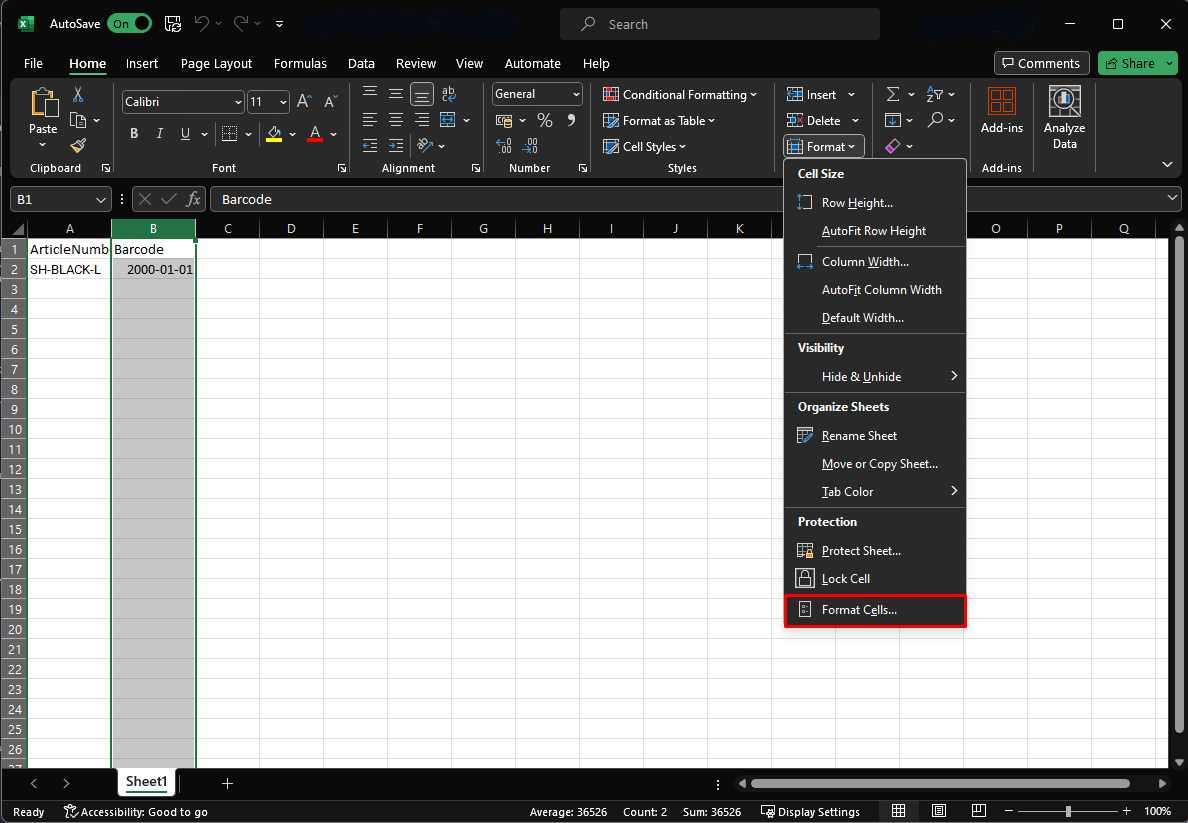
Click the header cell above the column you want to stop from formatting (The green cell with the letter B in the picture below).
To select multiple columns, select the first column as instructed, hold Ctrl/Cmd (Windows/Mac), and click more column header cells. To select a range of columns, hold Shift instead.

Step 2: Open the "Format Cells" dialog
Click Format, followed by Format Cells.
Step 3: Set the column format to "Text"
Select the Text format, and click OK.
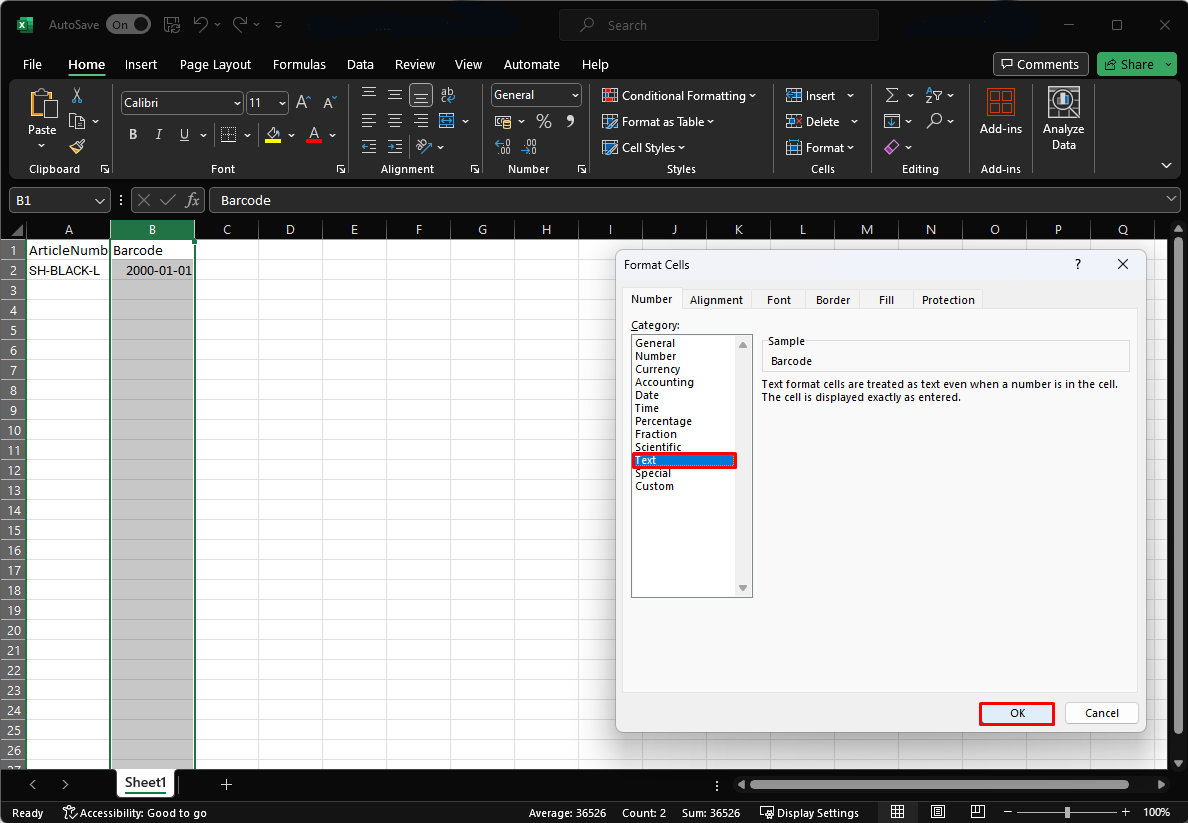
With this done, Excel should no longer save your data with an unexpected format.