Single order picking scanning
Table of contents
- Introduction
- Video
- Settings common to all outbound scanning flows
- Article number based scanning
- Item based scanning
- GS1/SSCC scanning
Introduction
In our standard picking scanning flow, each user picks one order at a time using a hand-held unit. When a user has finished picking an order, he can move on to the next order.
If you want one user to be able to pick several orders at the same time, consider using a batch pick scanning or packing scanning instead.
The standard workflow when using the picking scanning is to first prepare the orders which are to be picked. This is done using a computer (not a hand-held unit). When that has been done, the prepared orders will appear in the hand-held units. A user can then select an order in the hand-held unit to work with. As he scans the articles which he picks, they are removed from the warehouse's stock balance. The picking progress can easily be monitored in the system.
The following information can be displayed in the hand-held unit to aid during picking:
- A table containing the articles to pick
- A table containing the articles which have already been picked
- Customer information (name, address, way of delivery, etc.)
During picking, the user generally has these options available:
- By pressing "Clear" at any time during the scanning of article information; you can clear all scanned information for the current article.
- By pressing "Cancel" at any time during the scanning of article information; you can select a new order to work with.
- By pressing "Skip" you can skip a suggested article to process. Skipped articles will be placed at the back of the line of suggested articles.
Video
The following video shows the single order picking scanning flow using a smartphone with a connected Bluetooth scanner.
Settings common to all outbound scanning flows
-
Order statuses available for scanning
We generally use order statuses to control which orders are visible in the hand-held unit.
Default: "Allocated" (status ID 320). -
Way of selecting articles
Articles can be scanned, typed in, or selected in a dropdown list.
Default: Scan or type in.
-
Order status when the order is closed
When an order has been fully picked, the order status is updated to another status.
Default: Order is set to "Picked" (status ID 400) when it has been fully picked. If the workflow includes a freight booking step the status is instead changed to "Sent" (status ID 450).
-
Default number of items
You can choose if you want to scan/type how many items you pick, or to pick the allocated amount by default. You can also scan the articles one by one.
Default: Scan or type number of items.
-
Close order automatically when the order is finished
When an order has been fully picked, it can either be closed automatically, or you can force the user to close it manually by pressing a button. When the order is closed you can select a new order.
Default: Automatically close order scanning worklflow when it has been fully picked.
-
Should any actions be taken automatically when the order is closed?
It is possible to set up the system so that certain actions are taken automatically when an order is closed in the hand-held unit. For instance, an email can sent to the customer informing them that the order is finished, or the system could make a transport booking.
Default: Do nothing. - Do you want to add waybill rows at the end of the order scanning? If waybill rows are needed for the continued logistics workflow or if carrier service should be selected; it is possible to get a dialog where this is entered or scanned when everything are picked on an order. A waybill row can for example contain information about the number of packages, meassures, weight and goods description. Read more about the Waybill scanning dialog. Default: No waybill dialog.
- Do you want to charge your customer for the work performed during scanning? If the order flow is not e-commerce or any other type of fast moving goods where you charge a fixed amount per order; it is beneficial to continuously charge your customers for the work you do during scanning (e.g. time, packaging etc). This can be done via the Scanning charge dialog. Default: No charge control.
- Do you want to keep track of which parcel you place to goods on/in? A dialog for creating new parcels (pallets, boxes, containers etc) with parcel number on and connecting the scanned article to them can be used. Default: No parcel creating dialog.
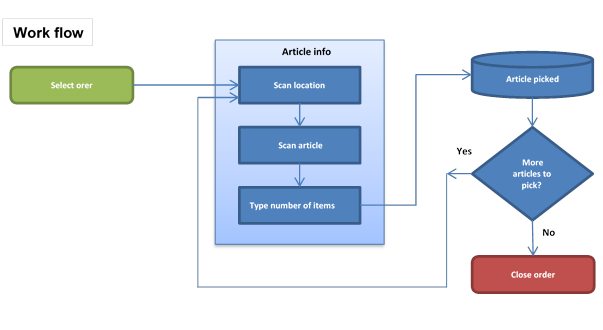
Article number based scanning
This is the most common type of scanning. The articles are identified only by their article number. This means that you can't differentiate between two items with the same article number.

Settings
-
Article information
Which information to be scanned/typed in the scanning can be modified, as can the order in which the information is scanned. The following information can be scanned/typed in the scanning:- Article (Article Number or Barcode)
- Number of items
- Location
- Batch
- Serial number
- Weight
-
Set serial number/batch
Normally, serial numbers are used to identify a single item of an article. If the serial number has not been set at inbound delivery it can be set in the outbound scanning. Batch numbers can also be set during outbound scanning.
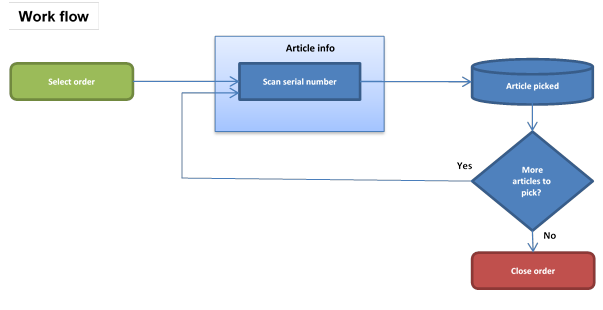
Item based scanning
This type of scanning differentiates between articles with the same article number by using serial numbers. Since the system knows at what location each article with a serial number is located, you do not have to scan location.

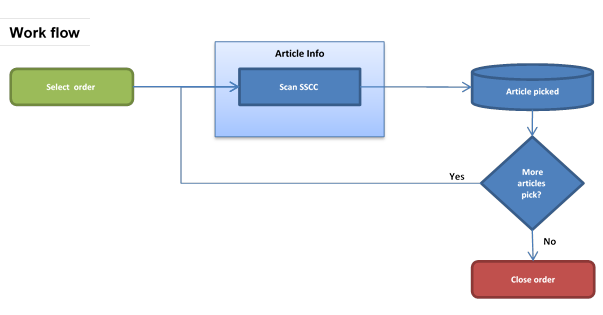
GS1/SSCC scanning
Since the system knows at what location each article with a serial number is located, you do not have to scan location.
