3PL invoicing
Table of contents
- Introduction
- Video on the 3PL invoicing module in Ongoing WMS
- The price list
- Invoices
- Advanced setup of statistical charges
- Exporting invoices
Introduction
Ongoing WMS has a powerful module for managing invoices. It allows the warehouse to accurately keep track of what to charge its customers.
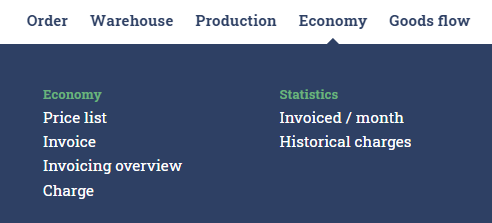
This page will show you how to set up a price list for a goods owner, how to add charges to an invoice, and how to export an invoice. Everything related to the invoices can be maintained in the Economy part of the menu:
Video on the 3PL invoicing module in Ongoing WMS
Price list
The price list for a particular goods owner contains all possible charges for that goods owner, and the associated pricing setup for each charge.
There are two types of charges which you can make: manual and statistical. A manual charge is one which must be added manually by a warehouse worker. A statistical charge is a charge which is computed automatically by the system.
The price list is maintained in Economy ⇒ Price list.
Manual charges
A manual charge is one which must be manually added to an invoice.
Example: extra packing material for an order
Let's say that some orders require some extra packing material. You want to be able to keep track of how much of the packing material you have used, and which orders required the extra material.
To be able to record this on an invoice, you first need to set up a charge for it. If each unit of packing material costs $13, you can create the charge in Economy ⇒ Price list like so:
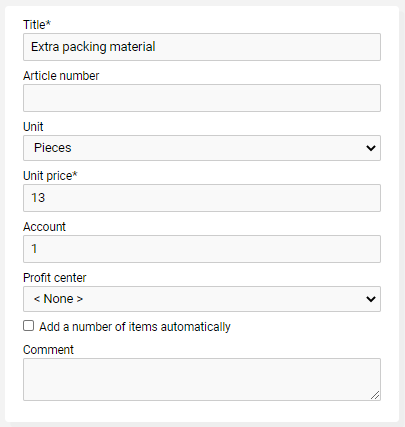
The following fields are mandatory:
| Field | Description |
|---|---|
| Title | The title of the charge which will be printed on the invoice. |
| Unit Price | The cost of each unit of charge. |
Statistical charges
Statistical charges are those which the system can automatically compute, for instance "how many orders were shipped during the invoice period". Creating a statistical charge is like creating a manual charge, but it includes an additional step where you must select which statistic you want.
Example: number of shipped orders
Let's say you wish to charge $15 for each order that you ship. This can be set up as a statistical charge. First input the title, unit price and account, just like you did in the previous example with a manual charge:
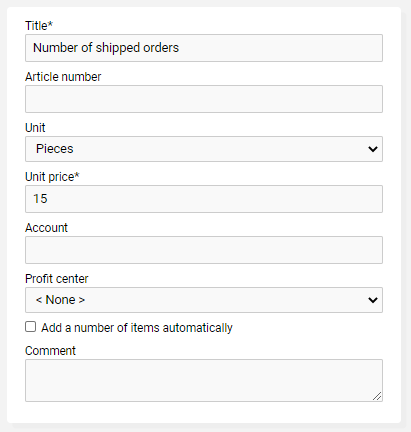
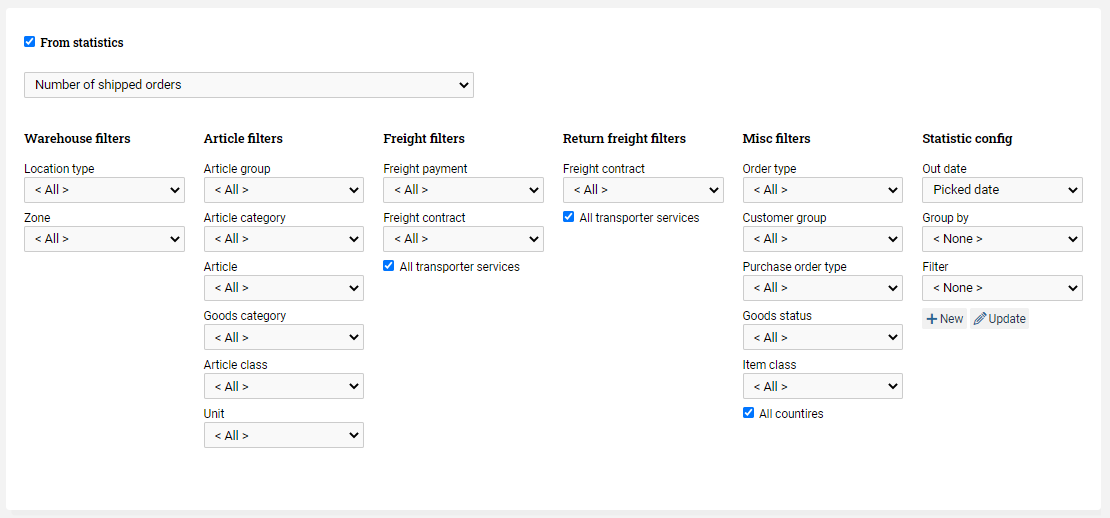
Then check From Statistics. This opens a list of available statistics. Choose Number of shipped orders:
Then click on Create.
Pricing setup
There are several different ways to set up the pricing structure for a charge.
Unit price
The simplest type of price is the unit price. This is the price which we have entered in the "Unit Price" field in all the above examples. Using this pricing structure, the total price of any charge will be the unit price multiplied by the number of charged items.
For instance, let's say you have entered a unit price of $13 for each shipped order. Then the system would charge the following amounts:
| Number of orders shipped | Price |
|---|---|
| 1 | 13 (13 × 1) |
| 10 | 130 (13 × 10) |
| 15 | 195 (13 × 15) |
Minimum and maximum
It is possible to set a minimum and maximum value when calculating the price using a unit price. Go to Price calculation and select Min/max. Enter the desired minimum and maximum. You do not have to enter both.
For instance, let's say you charge $13 per order shipped, and the minimum is $39, and the maximum is $1300. Then the system would charge the following amounts:
| Number of orders shipped | Price |
|---|---|
| 1 | 39 (13 × 1, but minimum amount $39 applies) |
| 3 | 39 (13 × 3) |
| 100 | 1300 (13 × 100) |
| 101 | 1300 (13 × 101, but maximum amount $1300 applies) |
Free count
It is possible to give the customer several items for free when using unit prices. Price calculation and select Min/max. In the field called Free count, enter the number of items which you want to give for free.
For instance, let's say you have entered a unit price of $13 for each shipped order, but you don't wish to charge for the first two orders, so you have entered free count = 2. Then the system would charge the following amounts:
| Number of orders shipped | Price |
|---|---|
| 1 | 0 (13 × 1, but free count applies) |
| 2 | 0 (13 × 2, but free count applies) |
| 3 | 13 (13 × 1, since the first two items are free) |
| 4 | 26 (13 × 2) |
| 10 | 104 (13 × 8) |
Price matrices
For more complex pricing structures, you can use price matrices (staffling in Swedish).
To set up a price matrix for a particular charge, go to Price calculation and select Price matrix. There are three types of matrices which we will now describe.
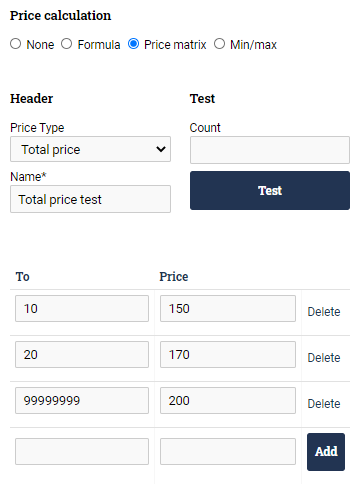
Total price
The total price matrix allows you to set the total price for an interval. Continuing with the example above of charging for shipped orders, let's say you want the following pricing structure:
- If you ship between 1 and 10 orders (inclusive) during the invoice period, then the total charge is $150.
- If you ship between 11 and 20 orders (inclusive) during the invoice period, then the total charge is $170.
- If you ship more than 21 orders during the invoice period, then the total charge is $200.
This structure can be set up like this:
Using this structure, the system will charge the following amounts:
| Number of orders shipped | Price |
|---|---|
| 1 | 150 |
| 10 | 150 |
| 11 | 170 |
| 20 | 170 |
| 21 | 200 |
Unit price
You might wish to specify different unit prices for different intervals. This can be accomplished using the price matrix type Unit price. Consider this setup:
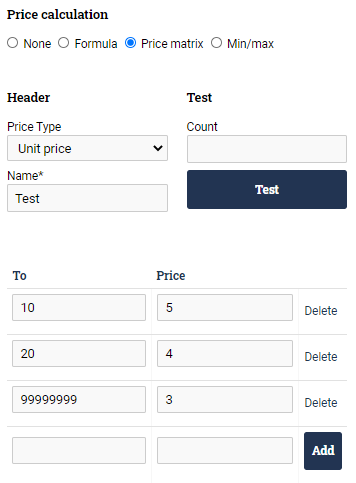
It will result in the following prices:
| Number of orders shipped | Price |
|---|---|
| 9 | 45 (9 × 5) |
| 10 | 50 (10 × 5) |
| 11 | 44 (11 × 4) |
| 19 | 76 (19 × 4) |
| 20 | 80 (20 × 4) |
| 21 | 63 (21 × 3) |
Unit price per interval
This structure is like a pricing matrix of type Unit price, but it will apply the unit price for each interval. Consider this structure:
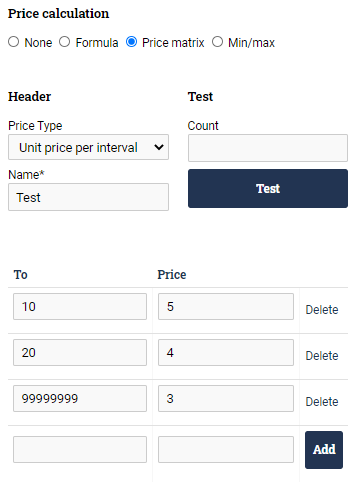
It will result in the following prices:
| Number of orders shipped | Price |
|---|---|
| 9 | 45 (9 × 5) |
| 10 | 50 (10 × 5) |
| 11 | 54 (10 × 5 + 1 × 4) |
| 19 | 86 (10 × 5 + 9 × 4) |
| 20 | 90 (10 × 5 + 10 × 4) |
| 21 | 93 (10 × 5 + 10 × 4 + 1 × 3) |
Additional fixed price
When using price matrices, you may opt to specify an additional fixed price. This price will simply be added to the price which is calculated using the price matrix.
Mass processing
The price list often contains many entries, and many goods owners have similar price lists. There are several features available to mass process price lists:
- Copy price list from another goods owner - For copying a selected set of price list entries from another goods owner to the current one.
- Update price with percentage - Useful for adjusting the prices yearly due to a price index change.
- Multiple update - Lets you update information for several entries at the same time.

Invoices
After you have set up the price list for a goods owner, you are ready to start creating invoices. Invoices are maintained in Economy ⇒ Invoice.
Creating a new invoice
In Economy ⇒ Invoice there is a form where you can create a new invoice:
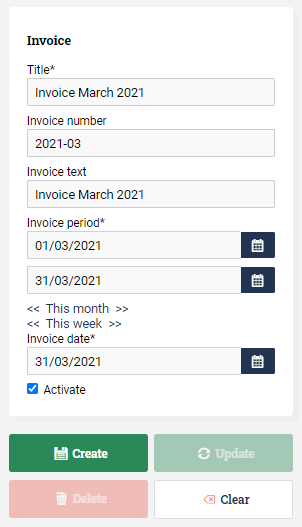
The following fields are available:
| Field | Mandatory to fill in | Description |
|---|---|---|
| Title | Yes | Your own title for the invoice. |
| Invoice number | No | The goods owner's title for the invoice. This is the field which is printed on the invoice specification. |
| Invoice text | No | Can be used to store whatever information you want. |
| Invoice period (to and from) | Yes | The period which this invoice is for. These are the dates which will be used when the statistical charges are computed. |
| Invoice date | Yes | The logical date when the invoice was issued. |
| Activate | Yes | Whether or not this invoice should be the goods owner's active invoice. |
Once you have filled in all the data, you can either click on Create or Calculate The difference between those two buttons is that Calculate will both create the invoice and calculate the statistical charges. Create will only create the invoice. It is possible to recalculate an invoice if it is missing the statistical charges.
The active invoice
As mentioned above, you may choose to activate an invoice when you create it. A goods owner can have at most 1 active invoice at a time. When you add a manual charge, then the charge will be added to the goods owner's active invoice. That is what separates an active invoice from a non-active one.
Adding a manual charge
Not connected to an order
The easiest way to add a manual charge is to add one which is not connected to an order. Go to Economy ⇒ Charge and verify that the current active invoice is the correct one:

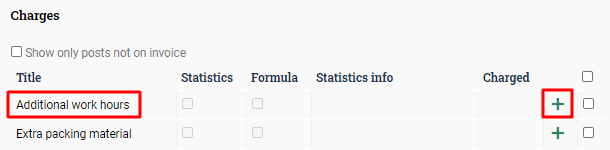
On the right-hand side of the screen, you have a list of all possible charges that you can make. Say that you have previously created a price list entry called Additional work hours and you want to charge 2 of them. Click on Add:
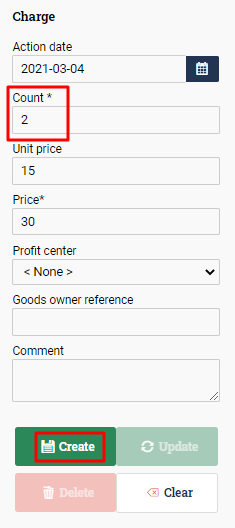
Then enter 2 and click on Create:
Connected to an order
It is also possible to create a manual charge which is connected to an order. If you do this, then you will be able to trace the charge back to a particular order.
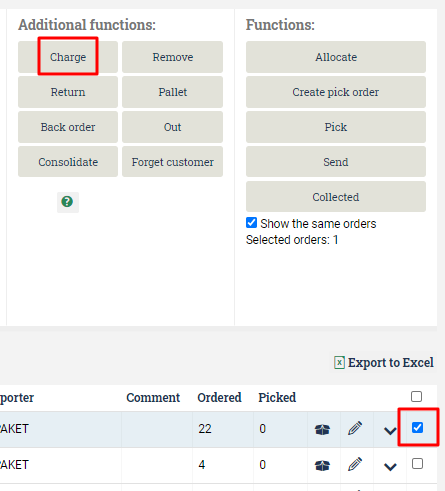
Go to Order ⇒ Order List and check an order. Then click Charge:
You will be taken to another page where you can view all possible charges. Enter the quantity and a comment, and then click Add:

Calculating the statistical charges
As described above, if you have created an empty invoice, then you may wish to calculate the statistical charges at some later point. To do so, go to Economy ⇒ Invoice and select the invoice. The click Calculate. The system will calculate the statistical charges and take you to a page where you can view the individual invoice lines.
This is how our test invoice looks with two manual charges, and one statistical charge:

Recalculating an invoice
To recalculate an invoice, go to Economy ⇒ Invoice and select the invoice. Then click on Details icon ![]() . This takes you to a page where you can inspect the current invoice rows. Before you recalculate the invoice, you must clear it:
. This takes you to a page where you can inspect the current invoice rows. Before you recalculate the invoice, you must clear it:
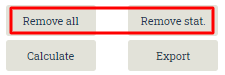
You have two options:
- If you click on Remove all, then all charges (both manual and statistical) will be removed from the invoice.
- If you click on Remove stat., then only the statistical charges will be removed. The manual charges will be left alone.
After you have clicked on Remove all or Remove stat., then click on Calculate. This recalculates the invoice.
Moving charges between invoices
If a charge (either manual or statistical) has ended up on the wrong invoice, you can move the charge. Go to Economy ⇒ Invoice and select the invoice which contains the charges. Press "Details". Select the invoice rows which you want to move, and then click Move to another invoice:

This takes you to another page where you can select which invoice you want to move the charges to:

Automatic invoicing
If you have many goods owners, it may be onerous to create new invoices for each goods owner every month, and to calculate the previous month's invoices. These steps can be automated by using Registers ⇒ Automated processes.
Go there and add a new automated process with type "Create and calculate invoices every invoice period".
Select which goods owners you want the automated process to apply to.
Select your definition of when the invoice periods start. You can choose between:
- "From the first day of the month to the last day of the month". If you choose this option, then the system will automatically create and activate a new invoice on the first of each month.
- "From day 1-15 of the month, and then from day 16 to the last day of the month". If you choose this option, the system will automatically create a new invoice on day 1 and 16 of each month.
So with option 1, the system would automatically create invoices like this:
- 2024-01-01 - 2024-01-31
- 2024-02-01 - 2024-02-29
- 2024-03-01 - 2024-03-31
And with option 2, the system would automatically create invoices like this:
- 2024-01-01 - 2024-01-15
- 2024-01-16 - 2024-01-31
- 2024-02-01 - 2024-02-15
- 2024-02-16 - 2024-02-29
- 2024-03-01 - 2024-03-15
- 2024-03-16 - 2024-03-31
You can also choose whether you want the system to automatically calculate the previous period's invoice whenever a new invoice is created.
The make sure to click "Enabled", and then click Save.
Advanced setup of statistical charges
We demonstrated earlier how to create a statistical charge which allowed you to charge for each shipped order. There are additional setups which can be made for a statistical charge.
Filters
Most statistical charges have several filters. These allow you to restrict the statistical charge to some transactions. For instance, if you only wanted to charge for shipped orders which contained the Broom handle article, then you could set it up like so:
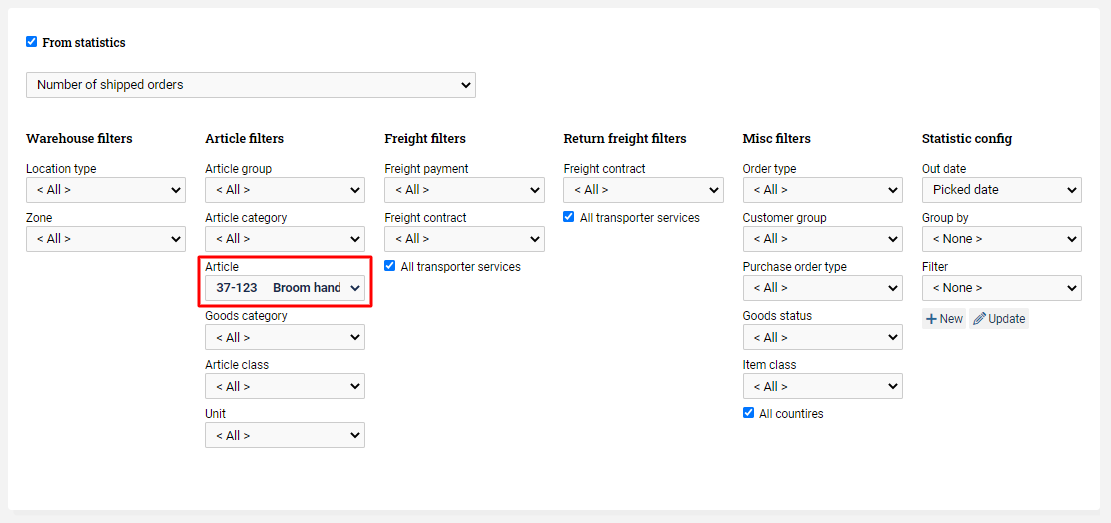
Exactly which filters are available depends on the statistical charge.
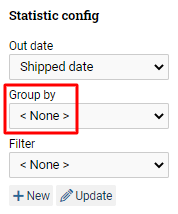
Grouping
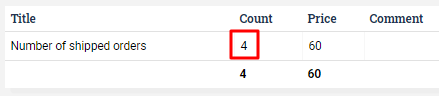
Continuing with the example of charging for shipped orders, let's say you have shipped four orders during the invoice period. By default, the Grouping setting on the charge is set to None:
This means that when you generate the invoice, you will simply see the charge as four orders:
Let's say you want to present this information differently to the customer. You want to show exactly which orders were shipped during the invoice period. Change the grouping to Order instead:
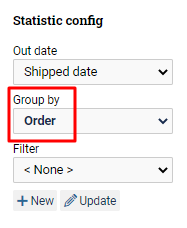
When you recalculate the invoice, it will now have four separate charges, each of which includes order information:

As with the filters, which groupings are available depends on the statistical charge.
Note that the pricing calculation will be applied for each group.
Summation
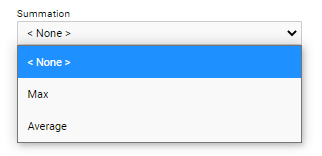
If you instead want to look at an example where you want to charge based on the number of used warehouse locations, let's say you have stored goods in 4 locations between the first and the 14th in a given month, and on the 14th one additional location was used. The invoice period has been chosen to one whole month consisting of 30 days. For simplicity the price given for this setting is 1. There are then three options for Summation:
- None,
- Max,
- Average.
If you choose None, the number of days each warehouse location has been used will summed. For this example this will be 4 locations × 14 days + 1 location × 1 day = 57.
The Max option finds the day where the maximum number of locations were used and uses that amount. For this example this will be 5 locations × 1 chosen period = 5.
The last option, Average, will calculate the average number of days each location has been used for the given period, and sum it together. For this example this will be 4 locations × 14 days / 30 days + 1 location × 1 days / 30 days = 1.9.
Exporting invoices
Eventually comes a time when you need to send your invoices to the customers. There are several different ways to export an invoice out of Ongoing.
Download invoice as a file
The most basic way to export an invoice is downloading it as a PDF or Excel file. In order to export your active invoice as a file, go to Economy ⇒ Charge and click the download symbol for the file format of your choice.

You can download any non-active invoice in a similar manner from Economy ⇒ Invoice.
Export invoice to another system via an integration
If there is an integration between Ongoing WMS and the accounting system that you are using for invoicing, you can have it set up so that invoices can be exported to your accounting system at the click of a button. The following systems are possible to set up invoicing integration with:
If you are missing a system, please contact your representative at Ongoing.
Once an integration has been set up for your system, you can export your active invoice from Ongoing to your accounting system by going to Economy ⇒ Charge and clicking Export.

Once you have clicked Export, the invoice should show up in your accounting system.
You can export any non-active invoice in a similar manner from Economy ⇒ Invoice.
Get invoices via the API
If your accounting system currently doesn't have an invoice integration with Ongoing, you might want to consider developing one. For this purpose, Ongoing provides the API function GetInvoicesByQuery which you can read more about in the API documentation.